2/22〜26
10時〜15時くらい
各自ノートパソコンを持ち込んでください
7階ゼミコーナーにて
進度によっては25日は休みになるかもしれません.
事前にunityをインストールしてきてください.
事前にこちらを参考に
http://japan.unity3d.com/blog/?p=1346
特にパソコンにログインするとき,日本語ユーザ名だとトラブル多発です
インストールはこちらを参考に
http://hiromart.com/blog/how_to_install_unity5/

2/22〜26
10時〜15時くらい
各自ノートパソコンを持ち込んでください
7階ゼミコーナーにて
進度によっては25日は休みになるかもしれません.
事前にunityをインストールしてきてください.
事前にこちらを参考に
http://japan.unity3d.com/blog/?p=1346
特にパソコンにログインするとき,日本語ユーザ名だとトラブル多発です
インストールはこちらを参考に
http://hiromart.com/blog/how_to_install_unity5/
どうしても同じルームに入り,customRoomPropertiesを取得して,同じルームに入室している人全員に同じ設定を与えたかったので.
(1)まずルーム作成のスクリプト
これは空のゲームオブジェクトに当てる
using UnityEngine;
using System.Collections;
using Hashtable = ExitGames.Client.Photon.Hashtable; //require for generate hashtable

public class photonsystem : Photon.MonoBehaviour {
	public string objectName;//use for photon instantiate
	private bool connectFailed = false; //use for network status check

	//set player name
	private string playerName = "GuestAAA";//a player name
	//set room name
	private string roomName = "liub2";//liub2という専用のルーム名を作成

	void OnJoinedLobby() {
			Debug.Log("ロビーに入室");
			//ランダムにルームへ参加
		}


	//call when room list upadate "must use"
	void OnReceivedRoomListUpdate(){
		CreateRoom ();
	}


	/////create room with custom room options

	public void CreateRoom (){
		RoomOptions roomOptions = new RoomOptions ();
		roomOptions.isVisible = true;
		roomOptions.isOpen = true;
		roomOptions.maxPlayers = 50;//test 50 max players
		roomOptions.customRoomProperties = new ExitGames.Client.Photon.Hashtable (){{"CustomProperties", "111"},{"r", "blue"}};
		roomOptions.customRoomPropertiesForLobby = new string[] {"CustomProperties"};

		if (PhotonNetwork.GetRoomList ().Length == 0) {
			PhotonNetwork.CreateRoom (roomName, roomOptions, null);
			return;
		}
		foreach (RoomInfo roomInfo in PhotonNetwork.GetRoomList()) {
			if (roomInfo.name != roomName) {
				PhotonNetwork.CreateRoom (roomName, roomOptions, null);
			} else {
				//room name matched
				PhotonNetwork.JoinRoom(roomName);
			}
		}
	}


		/// 部屋に入るとき呼ばれます。
		/// これは参加する際だけでなく作成する際も含みます。
		void OnJoinedRoom() {
		Debug.Log("部屋に入室" + PhotonNetwork.room.name);

		//ゲームオブジェクト作成する時用
		//GameObject cube = PhotonNetwork.Instantiate(objectName, Vector3.zero, Quaternion.identity, 0);

		//make cube
		//GameObject player = PhotonNetwork.Instantiate("testobj", this.transform.position, this.transform.rotation, 0);
		}

		/// JoinRandom()の入室が失敗した場合に後に呼び出されます。
		void OnPhotonRandomJoinFailed() {
		//void OnPhotonJoinFailed() {
			Debug.Log("部屋入室失敗");
			//名前のないルームを作成
		//	PhotonNetwork.CreateRoom(null);

		/////以下はテスト用コメントアウトしています
		//create custom property
	//	RoomOptions myOptions = new RoomOptions ();// require use custom property
	//	myOptions.isVisible = true;
	//	myOptions.isOpen = true;
	//	myOptions.maxPlayers = 50;
	//	myOptions.customRoomProperties = new ExitGames.Client.Photon.Hashtable (){{"CustomProperties", "111"},{"r", "0.2"}};
	//	myOptions.customRoomPropertiesForLobby = new string[] {"CustomProperties"};

		// ルームの作成
	//	PhotonNetwork.JoinOrCreateRoom(roomName, myOptions, null);


		}


		void Awake() {
			//マスターサーバーへ接続
			PhotonNetwork.ConnectUsingSettings("v0.1");


		if (PhotonNetwork.playerName==null)
		{
			//ランダムにプレイヤーの名前を生成
			this.playerName = "Guest" + UnityEngine.Random.Range(1, 9999);
			//Photonにプレイヤーを登録
			PhotonNetwork.playerName = this.playerName;
		}else{
			//Photonにプレイヤーを登録
			this.playerName = PhotonNetwork.playerName;
		}

		}


	//部屋作成に成功したときにコール
	public void OnCreatedRoom(){
		Debug.Log("OnCreatedRoom");
	}
	//接続が切断されたときにコール
	public void OnDisconnectedFromPhoton(){
		Debug.Log("Disconnected from Photon.");
	}
	//接続失敗時にコール
	public void OnFailedToConnectToPhoton(object parameters){
		this.connectFailed = true;
		Debug.Log("OnFailedToConnectToPhoton. StatusCode: " + parameters + " ServerAddress: " + PhotonNetwork.networkingPeer.ServerAddress);
	}

	}
(2)そのカスタムプロパティを呼び出すスクリプト
これをライトにアサインしています
using UnityEngine;
using System.Collections;
using Hashtable = ExitGames.Client.Photon.Hashtable;
using UnityEngine.UI;

public class cpLight : MonoBehaviour {
	public Light lightObj2;
	private string cpstring = "red";

	// Use this for initialization
	void Start () {
		lightObj2 = GetComponent<Light>();
	}

	// Update is called once per frame
	void Update () {


	}


	//cp changed is here
	void OnPhotonCustomRoomPropertiesChanged(){

		if (PhotonNetwork.inRoom) {// ルームの状態を取得
			Room room = PhotonNetwork.room;
			if (room == null) {
				return;
			} else {
				Hashtable cp = room.customProperties;
				//cpstring = (string)cp ["r"];
				cpstring = (string)cp ["r"];
				//Debug.Log (cp ["r"]);
				if (cpstring == "blue") {
					lightObj2.color = Color.blue;
					//GetComponent<Light>.color = Color.blue;
				}
				if (cpstring == "red") {
					lightObj2.color = Color.red;
					//GetComponent<Light>.color = Color.blue;
				}
				if (cpstring == "green") {
					lightObj2.color = Color.green;
					//GetComponent<Light>.color = Color.blue;
				}
			}
		}

	}


}
(3)テスト用にボタンを作成し,そのボタンにあてるスクリプトです
using UnityEngine;
using System.Collections;
using Hashtable = ExitGames.Client.Photon.Hashtable;

public class lightColor : Photon.MonoBehaviour {

	public Light lightObj;

	// Use this for initialization
	void Start () {

	}

	// Update is called once per frame
	void Update () {


	//	if (!photonView.isMine) {
			//transform.position = Vector3.Lerp(transform.position, this.correctPlayerPos, Time.deltaTime * 5);
			//transform.rotation = Quaternion.Lerp(transform.rotation, this.correctPlayerRot, Time.deltaTime * 5);


	//	}

	}

	public void colorRed(){
		//lightObj.color = Color.red;
	ExitGames.Client.Photon.Hashtable h = new ExitGames.Client.Photon.Hashtable() { { "r", "red" } };
	PhotonNetwork.room.SetCustomProperties(h);

	}


	public void colorGreen(){
	//	lightObj.color = Color.green;
		ExitGames.Client.Photon.Hashtable h = new ExitGames.Client.Photon.Hashtable() { { "r", "green" } };
		PhotonNetwork.room.SetCustomProperties(h);
	}

	public void colorBlue(){

		ExitGames.Client.Photon.Hashtable h = new ExitGames.Client.Photon.Hashtable() { { "r", "blue" } };
		PhotonNetwork.room.SetCustomProperties(h);
	//	lightObj.color = Color.blue;
	}

}
これで,ボタンをクリックすると
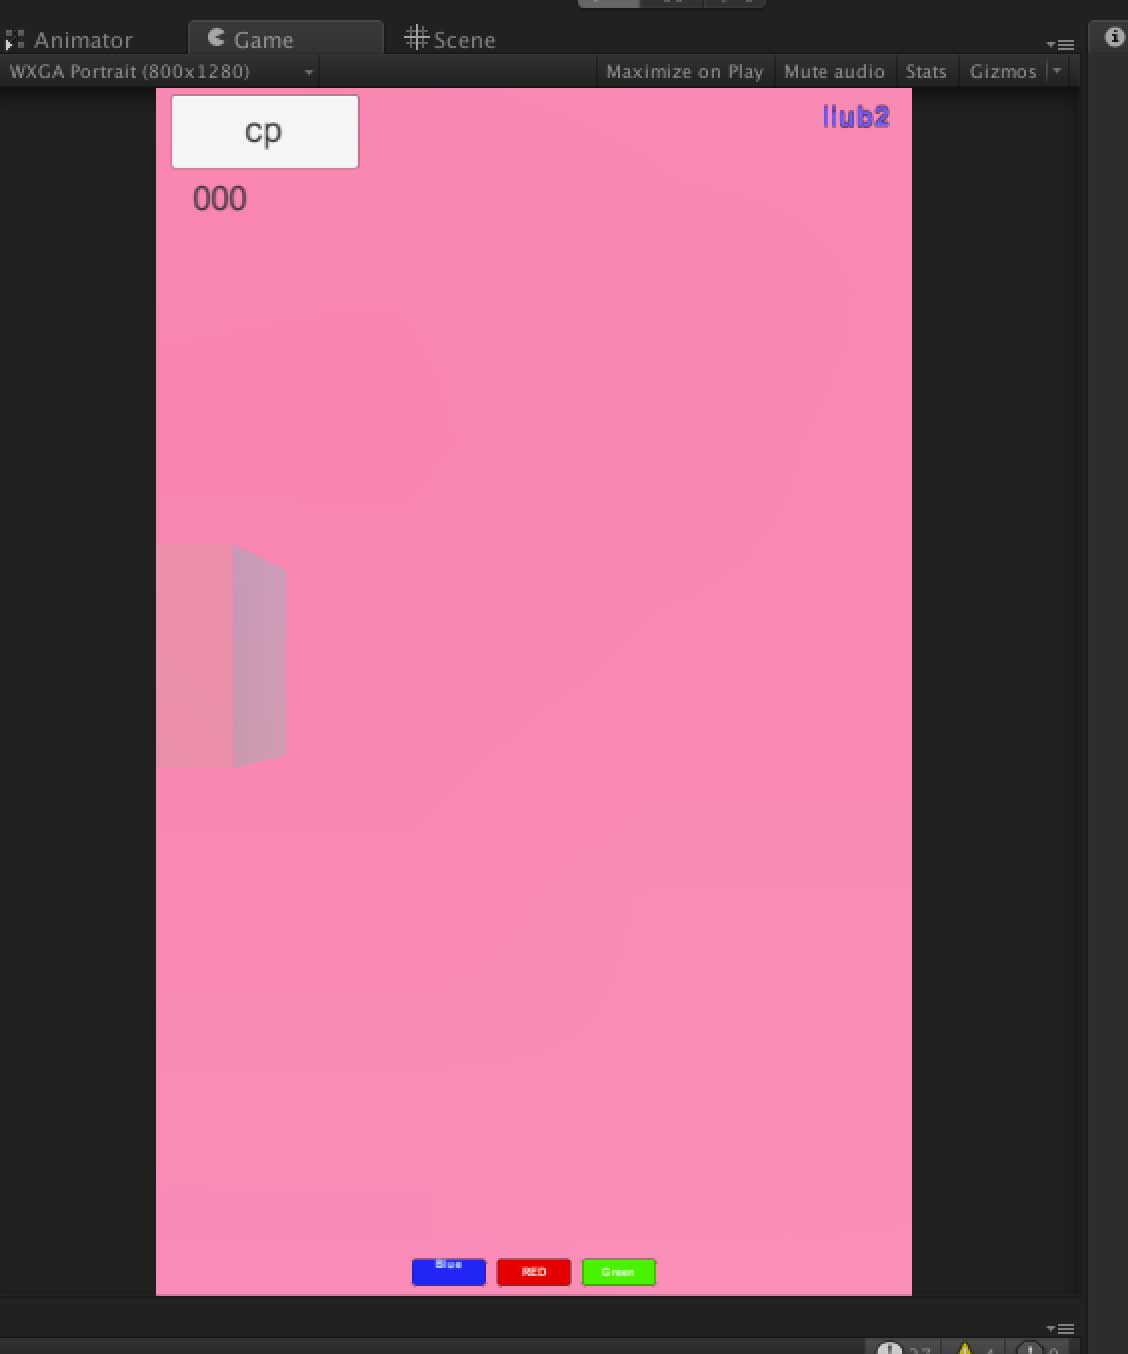
このアプリの画面は全て同じ色になります.タイムラグは1秒以内くらいです
テラシュールブログさんありがとう!
カスタムプロパティを変えたときに呼ばれるがこれ
void OnPhotonCustomRoomPropertiesChanged(){ }
ちなみにupdateでカスタムプロパティ呼ぶとたぶん2回目でエラーでる(未検証).どうも別の所にスクリプトがアサインされてたっぽい.
なので,onChangeが必要だったのですが,onChangeで検索しても出てこず,まさかChangedだったとは,,,
参照先
Unityで作成中のイベント用アプリの作成メモです
現在作成中のアプリですが,同期などの関係から(たぶん)全員が同じ部屋に入ることが必要です.
そこでいろいろ面倒が発生します(以下,photonのレベル別マッチメイクのスクリプトなどから流用しています)
(1)photonネットワーク接続直後にはroom listを取得してもゼロが返るっぽい.不確実だけど対抗策は
void OnReceivedRoomListUpdate()
で,リストがアップデートされてから,ルームリストをチェックする.
(2) PhotonNetwork.CreateRoom()はどうもエラーが起きやすい.ので,確実にその名前のルームが無いことを確認しなくてはいけない(そこで上記のルームリストを使うけど,タイミングが,,,
(3)そこでおおまかな流れとしては,Photonに接続して,ロビーに入ったら,そのままにしておいてリストのアップデートを待つ.アップデートされない時のために,5秒くらい待つ関数を入れるか思案中(未実装).リストがアップデートされたら,同名のルーム名がないかチェックして,あればそこに入室,なければ作成をする.
ここまでのスクリプトです.
using UnityEngine;
using System.Collections;
using Hashtable = ExitGames.Client.Photon.Hashtable; //need for generate hashtable

public class photonsystem : Photon.MonoBehaviour {
	public string objectName;
	private bool connectFailed = false;

	//set player name
	private string playerName = "GuestAAA";
	//set room name
	private string roomName = "liub2";//liubという専用のルーム名を作成


	void OnJoinedLobby() {
			Debug.Log("ロビーに入室");
			//ランダムにルームへ参加

		//thi wrok
		//PhotonNetwork.JoinRandomRoom();// join to random room tempolary
		//until here//

		}


	void OnReceivedRoomListUpdate()
	{
		CreateRoom ();
	}


	/////test 24th January

	public void CreateRoom (){
		RoomOptions roomOptions = new RoomOptions ();
		roomOptions.isVisible = true;
		roomOptions.isOpen = true;
		roomOptions.maxPlayers = 50;//test 50 max players
		roomOptions.customRoomProperties = new ExitGames.Client.Photon.Hashtable (){{"CustomProperties", "111"},{"r", "0.2"}};
		roomOptions.customRoomPropertiesForLobby = new string[] {"CustomProperties"};

		if (PhotonNetwork.GetRoomList ().Length == 0) {
			PhotonNetwork.CreateRoom (roomName, roomOptions, null);
			return;
		}
		foreach (RoomInfo roomInfo in PhotonNetwork.GetRoomList()) {
			if (roomInfo.name != roomName) {
				PhotonNetwork.CreateRoom (roomName, roomOptions, null);
			} else {
				//isRoomEnabled = true;
				PhotonNetwork.JoinRoom(roomName);
			}
		}
	}


		/// 部屋に入るとき呼ばれます。
		/// これは参加する際だけでなく作成する際も含みます。
		void OnJoinedRoom() {
		Debug.Log("部屋に入室" + PhotonNetwork.room.name);

		//ゲームオブジェクト作成する時用
		//GameObject cube = PhotonNetwork.Instantiate(objectName, Vector3.zero, Quaternion.identity, 0);

		//make cube
		//GameObject player = PhotonNetwork.Instantiate("testobj", this.transform.position, this.transform.rotation, 0);
		}

		/// JoinRandom()の入室が失敗した場合に後に呼び出されます。
		void OnPhotonRandomJoinFailed() {
		//void OnPhotonJoinFailed() {
			Debug.Log("部屋入室失敗");
			//名前のないルームを作成
		//	PhotonNetwork.CreateRoom(null);

		/////以下はテスト用えコメントアウトしています
		//create custom property
	//	RoomOptions myOptions = new RoomOptions ();// require use custom property
	//	myOptions.isVisible = true;
	//	myOptions.isOpen = true;
	//	myOptions.maxPlayers = 50;
	//	myOptions.customRoomProperties = new ExitGames.Client.Photon.Hashtable (){{"CustomProperties", "111"},{"r", "0.2"}};
	//	myOptions.customRoomPropertiesForLobby = new string[] {"CustomProperties"};

		// ルームの作成
	//	PhotonNetwork.JoinOrCreateRoom(roomName, myOptions, null);


		}


		void Awake() {
			//マスターサーバーへ接続
			PhotonNetwork.ConnectUsingSettings("v0.1");


		if (PhotonNetwork.playerName==null)
		{
			//ランダムにプレイヤーの名前を生成
			this.playerName = "Guest" + UnityEngine.Random.Range(1, 9999);
			//Photonにプレイヤーを登録
			PhotonNetwork.playerName = this.playerName;
		}else{
			//Photonにプレイヤーを登録
			this.playerName = PhotonNetwork.playerName;
		}

		}


	//部屋作成に成功したときにコール
	public void OnCreatedRoom(){
		Debug.Log("OnCreatedRoom");
	}
	//接続が切断されたときにコール
	public void OnDisconnectedFromPhoton(){
		Debug.Log("Disconnected from Photon.");
	}
	//接続失敗時にコール
	public void OnFailedToConnectToPhoton(object parameters){
		this.connectFailed = true;
		Debug.Log("OnFailedToConnectToPhoton. StatusCode: " + parameters + " ServerAddress: " + PhotonNetwork.networkingPeer.ServerAddress);
	}

	}
※この方法は通常の使い方と異なります
サンプルのほとんどは,自分のキャラを相手側に出現させるという方法ですが,これはライトの色をマスター側が操作し,クライアント側の色を変えるというものです.
ライブイベントでみんなのスマホの色を同時に変更したい!を実現させる一つのアイデアです.

赤線の部分を
操作される側(クライアント)は Takeoverに
操作する側(マスター)はFixedにします.
これでマスター側で色を変えると相手側も同じ色になります
その他のスクリプトは後日
micinputのサンプルがどれを試してもうまくいかない.
サンプルの記事ですと,コンソールにずっとゼロが表示されて音量が変化しません.
(最初に参考にさせていただいたスクリプト http://www.jonki.net/entry/20130607/1370622815 )
思い悩んで2日目,グーグルさんに1年以内の記事に限って検索するとその答えが載っていた.
まずはスクリプト(改変済み)
using UnityEngine;
using System.Collections;
//script source from web sample
//
public class micinput : MonoBehaviour {

	void Start()
	{

		//check
		foreach (string device in Microphone.devices) {
			Debug.Log("Name: " + device);
		}
		//
		GetComponent<AudioSource>().clip = Microphone.Start(null, true, 999, 44100);  // マイク入力
		GetComponent<AudioSource>().loop = true; // ループ再生にしておく
		//GetComponent<AudioSource>().mute = true; // Unity5ではコメントアウトうる
		while (!(Microphone.GetPosition("") > 0)){}             // マイクが使えるまで待つらしい
		GetComponent<AudioSource>().Play();                                           // 再生しないと音量をチェックできない
	}


	void Update()
	{
		float vol = GetAveragedVolume();
		print(vol);
	}

	float GetAveragedVolume()
	{
		float[] data = new float[256];
		float a = 0;
		GetComponent<AudioSource>().GetOutputData(data,0);
		foreach(float s in data)
		{
			a += Mathf.Abs(s);
		}
		return a/256.0f;
	}


}
その対処方法
(ソース http://qiita.com/CST_negi/items/c8862f8d05dd9e871917 )
CreateEmptyで空のオブジェクトを作成
そこにスクリプトをアサインします
ミキサーの画面を呼び出し,[+]ボタンでミキサーを作成(ミキサなんてはじめてつこうたよ,,)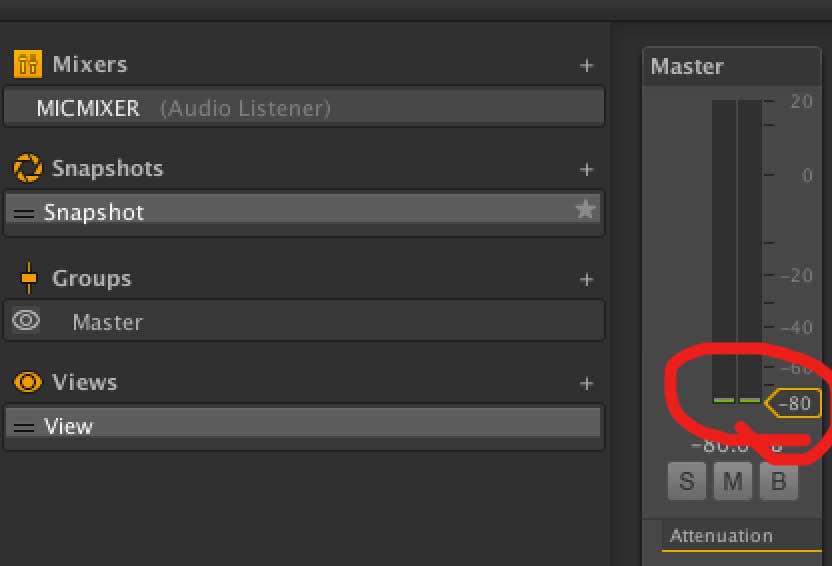
そのミキサのフェーダーを-80dbまで下げる(でないとハウリングおこしました)
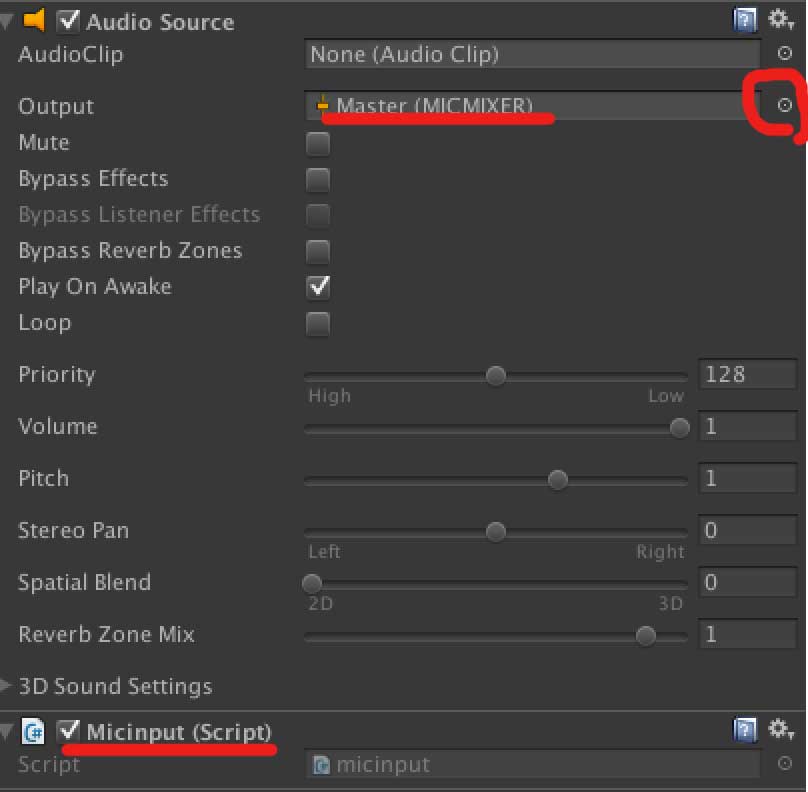
上で空のオブジェクトに割り当てたたスクリプト(画面最下段の赤線)にAudio Sourceを割り当てます.
Outputに先ほど作成したミキサー(なぜかMasterと表示される)をアサインします
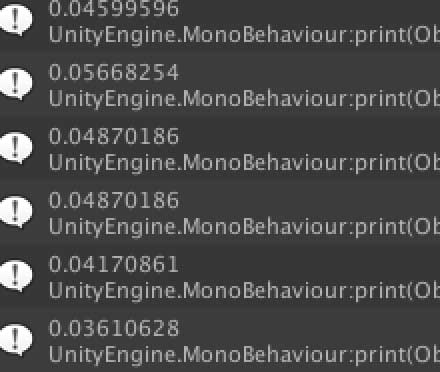
無事float値で取得できました
Xcodeのスクリプトをほぼ無改造のままAndroidStudioでいけました
#pragma once

#include "ofMain.h"
#include "ofxAndroid.h"

#include "ofxOpenCv.h"

class ofApp : public ofxAndroidApp{

	public:

		void setup();
		void update();
		void draw();

		void keyPressed(int key);
		void keyReleased(int key);
		void windowResized(int w, int h);

		void touchDown(int x, int y, int id);
		void touchMoved(int x, int y, int id);
		void touchUp(int x, int y, int id);
		void touchDoubleTap(int x, int y, int id);
		void touchCancelled(int x, int y, int id);
		void swipe(ofxAndroidSwipeDir swipeDir, int id);

		void pause();
		void stop();
		void resume();
		void reloadTextures();

		bool backPressed();
		void okPressed();
		void cancelPressed();


	ofVideoGrabber movie;
	ofxCvColorImage rgb,hsb;
	ofxCvGrayscaleImage hue,sat,bri,filtered;
	ofxCvContourFinder contours;

	int w,h;
	int findHue;


};
メインはこちら
#include "ofApp.h"

//--------------------------------------------------------------
void ofApp::setup(){

	//add by me
	ofBackground(0,0,0);
	ofSetOrientation(OF_ORIENTATION_90_LEFT);
	w = 640;//default 320
	h = 480;//default 240

	movie.initGrabber(w, h, true);

	//reserve memory for cv images
	rgb.allocate(w, h);
	hsb.allocate(w, h);
	hue.allocate(w, h);
	sat.allocate(w, h);
	bri.allocate(w, h);
	filtered.allocate(w, h);
}

//--------------------------------------------------------------
void ofApp::update(){

	// add by me
	movie.update();

	if (movie.isFrameNew()) {

		//copy webcam pixels to rgb image
		rgb.setFromPixels(movie.getPixels(), w, h);

		//mirror horizontal
		rgb.mirror(false, false);//default (false, true)

		//duplicate rgb
		hsb = rgb;

		//convert to hsb
		hsb.convertRgbToHsv();

		//store the three channels as grayscale images
		hsb.convertToGrayscalePlanarImages(hue, sat, bri);

		//filter image based on the hue value were looking for
		for (int i=0; i<w*h; i++) {
			filtered.getPixels()[i] = ofInRange(hue.getPixels()[i],findHue-5,findHue+5) ? 255 : 0;
		}

		filtered.flagImageChanged();
		//run the contour finder on the filtered image to find blobs with a certain hue
		contours.findContours(filtered, 20, w*h/2, 2, false);//last numeric 2 is find maximum cout
	}

}

//--------------------------------------------------------------
void ofApp::draw(){
	//add by me
	ofSetColor(255,255,255);

	//draw all cv images
	rgb.draw(0,0);
	//hsb.draw(640,0);
	//hue.draw(0,240);
	//sat.draw(320,240);
	//bri.draw(640,240);
	//filtered.draw(0,480);
	//contours.draw(0,480);

	ofSetColor(255, 0, 0);
	ofFill();

	//draw red circles for found blobs
	for (int i=0; i<contours.nBlobs; i++) {
		ofCircle(contours.blobs[i].centroid.x, contours.blobs[i].centroid.y, 10);// last text 10 is radius od draw circle
	}

}

//--------------------------------------------------------------
void ofApp::keyPressed  (int key){

}

//--------------------------------------------------------------
void ofApp::keyReleased(int key){

}

//--------------------------------------------------------------
void ofApp::windowResized(int w, int h){

}

//--------------------------------------------------------------
void ofApp::touchDown(int x, int y, int id){

// add by me
//calculate local mouse x,y in image

int mx = x % w;
int my = y % h;

//get hue value on mouse position
findHue = hue.getPixels()[my*w+mx];

}

//--------------------------------------------------------------
void ofApp::touchMoved(int x, int y, int id){

}

//--------------------------------------------------------------
void ofApp::touchUp(int x, int y, int id){

}

//--------------------------------------------------------------
void ofApp::touchDoubleTap(int x, int y, int id){

}

//--------------------------------------------------------------
void ofApp::touchCancelled(int x, int y, int id){

}

//--------------------------------------------------------------
void ofApp::swipe(ofxAndroidSwipeDir swipeDir, int id){

}

//--------------------------------------------------------------
void ofApp::pause(){

}

//--------------------------------------------------------------
void ofApp::stop(){

}

//--------------------------------------------------------------
void ofApp::resume(){

}

//--------------------------------------------------------------
void ofApp::reloadTextures(){

}

//--------------------------------------------------------------
bool ofApp::backPressed(){
	return false;
}

//--------------------------------------------------------------
void ofApp::okPressed(){

}

//--------------------------------------------------------------
void ofApp::cancelPressed(){

}
8行目で横向きモードにしています
35行目でカメラのミラー設定を無効にしています.実験がインカメラでしたが,バックカメラの場合は不要ですね.
実行結果は以下
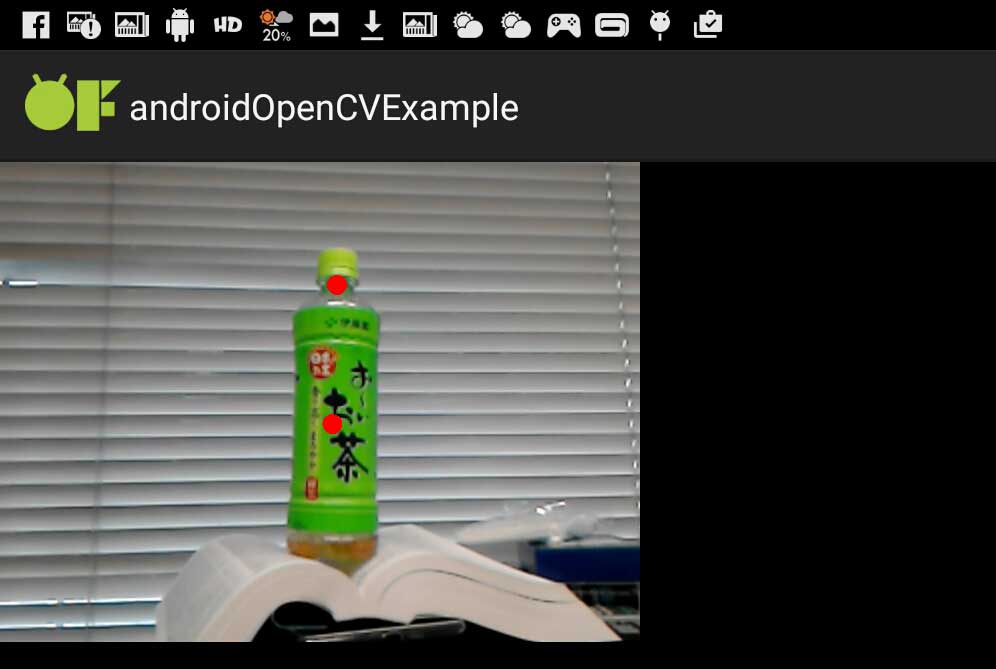
サンプルのopenCVがAndroid端末上で普通に走りました〜
いくつかのエラーが起きた.
まずはNDKの場所について
(後述)なんかNDKの場所をoFのAndroidのプロジェクトのなんかのファイルを,絶対パスで指定した
次にビルドは通っても,仮装デバイスへインストールができないエラー.
エラーメッセージは
android Installation error: INSTALL_FAILED_CONTAINER_ERROR
とでる.
この解決方法としては,
AndroidManifest.XMLの中の
android:installLocation=”preferExternal”
を
android:installLocation=”auto”
に変更することでクリアできました.
この設定はプロジェクト毎に設定する必要があります.
open frame worksでopenCVをやっちゃいます.
open frame works(以下oF)はプログラミング自体がとても簡略化されているのでプロトタイプの作成向きです.動作は重いとのことですが,リリースするものでなければそれほど難しくありません.
なおかつiPhone,Androidようにテンプレートがあり,そこに書き込めばスマホアプリが作れてしまいます.(AndroidやopenCVは未確認)
これはXCODEでのテストです
#pragma once

#include "ofMain.h"
#include "ofxOpenCv.h"

class ofApp : public ofBaseApp{

	public:
		void setup();
		void update();
		void draw();

		void keyPressed(int key);
		void keyReleased(int key);
		void mouseMoved(int x, int y );
		void mouseDragged(int x, int y, int button);
		void mousePressed(int x, int y, int button);
		void mouseReleased(int x, int y, int button);
		void mouseEntered(int x, int y);
		void mouseExited(int x, int y);
		void windowResized(int w, int h);
		void dragEvent(ofDragInfo dragInfo);
		void gotMessage(ofMessage msg);

    ofVideoGrabber movie;

    ofxCvColorImage rgb,hsb;
    ofxCvGrayscaleImage hue,sat,bri,filtered;
    ofxCvContourFinder contours;

    int w,h;
    int findHue;

};
そしてこっちも必要
#include "ofApp.h"

//--------------------------------------------------------------
void ofApp::setup(){
    ofBackground(0,0,0);

    w = 320;
    h = 240;

    movie.initGrabber(w, h, true);

    //reserve memory for cv images
    rgb.allocate(w, h);
    hsb.allocate(w, h);
    hue.allocate(w, h);
    sat.allocate(w, h);
    bri.allocate(w, h);
    filtered.allocate(w, h);
}

//--------------------------------------------------------------
void ofApp::update(){
    movie.update();

    if (movie.isFrameNew()) {

        //copy webcam pixels to rgb image
        rgb.setFromPixels(movie.getPixels(), w, h);

        //mirror horizontal
        rgb.mirror(false, true);

        //duplicate rgb
        hsb = rgb;

        //convert to hsb
        hsb.convertRgbToHsv();

        //store the three channels as grayscale images
        hsb.convertToGrayscalePlanarImages(hue, sat, bri);

        //filter image based on the hue value were looking for
        for (int i=0; i<w*h; i++) {
            filtered.getPixels()[i] = ofInRange(hue.getPixels()[i],findHue-5,findHue+5) ? 255 : 0;
        }

        filtered.flagImageChanged();
        //run the contour finder on the filtered image to find blobs with a certain hue
        contours.findContours(filtered, 20, w*h/2, 2, false);//last numeric 2 is find maximum cout
    }
}

//--------------------------------------------------------------
void ofApp::draw(){
    ofSetColor(255,255,255);

    //draw all cv images
    rgb.draw(0,0);
    hsb.draw(640,0);
    hue.draw(0,240);
    sat.draw(320,240);
    bri.draw(640,240);
    filtered.draw(0,480);
    contours.draw(0,480);

    ofSetColor(255, 0, 0);
    ofFill();

    //draw red circles for found blobs
    for (int i=0; i<contours.nBlobs; i++) {
        ofCircle(contours.blobs[i].centroid.x, contours.blobs[i].centroid.y, 10);// last text 10 is radius od draw circle
    }

}

//--------------------------------------------------------------
void ofApp::keyPressed(int key){

}

//--------------------------------------------------------------
void ofApp::keyReleased(int key){

}

//--------------------------------------------------------------
void ofApp::mouseMoved(int x, int y ){

}

//--------------------------------------------------------------
void ofApp::mouseDragged(int x, int y, int button){

}

//--------------------------------------------------------------
void ofApp::mousePressed(int x, int y, int button){
    //calculate local mouse x,y in image
    int mx = x % w;
    int my = y % h;

    //get hue value on mouse position
    findHue = hue.getPixels()[my*w+mx];
}

//--------------------------------------------------------------
void ofApp::mouseReleased(int x, int y, int button){

}

//--------------------------------------------------------------
void ofApp::mouseEntered(int x, int y){

}

//--------------------------------------------------------------
void ofApp::mouseExited(int x, int y){

}

//--------------------------------------------------------------
void ofApp::windowResized(int w, int h){

}

//--------------------------------------------------------------
void ofApp::gotMessage(ofMessage msg){

}

//--------------------------------------------------------------
void ofApp::dragEvent(ofDragInfo dragInfo){

}
混乱を防ぐために,テンプレデフォルトのまま書き足しています
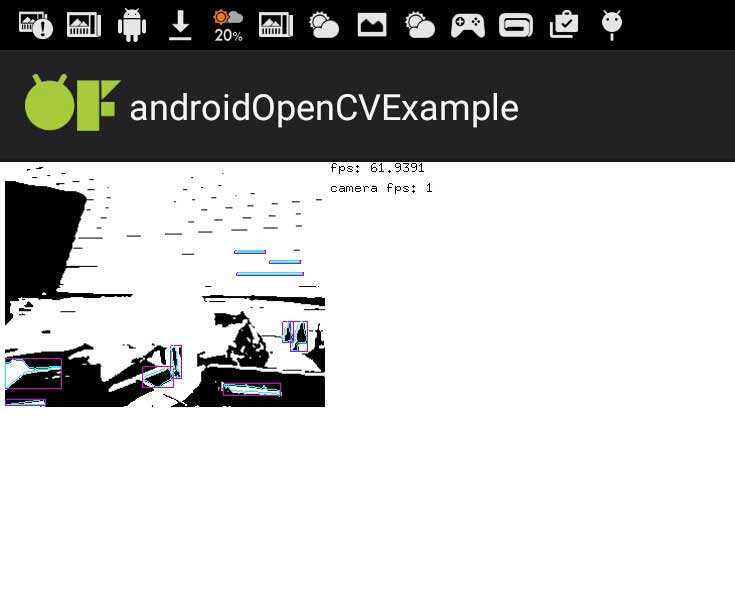
実行結果はこんな様子
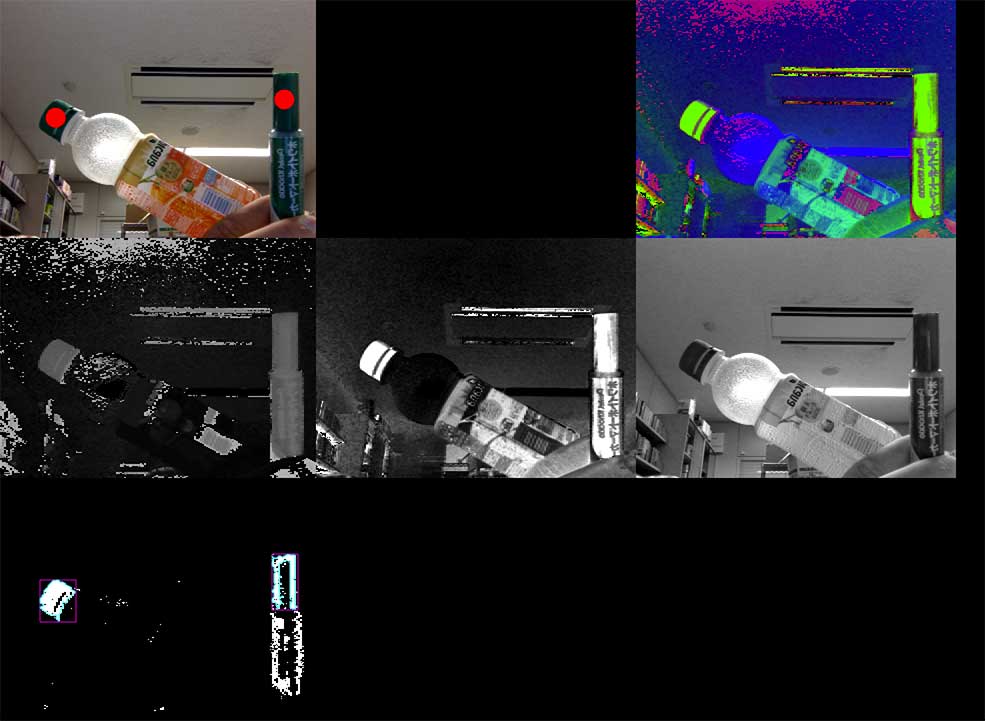
実行して,抽出したい色をクリックするとそこに赤丸が表示されます
抽出数はofApp.cppの49行目
contours.findContours(filtered, 20, w*h/2, 2, false);
のfalseの前の2で変えられます.2なら2個検出.