「C#」カテゴリーアーカイブ

WaypointAgent.cs のスクリプト

以下Gitよりダウンロードできます。

https://gist.github.com/tsubaki/7e22cec8527c534e4c7a

右上のRawを押すとソースがでてきますので、提示されたファイル名WaypointAgent.cs で保存

バックアップ


using UnityEngine;
using System.Collections;
using UnityStandardAssets.Utility;

[RequireComponent(typeof(WaypointProgressTracker))]
public class WaypointAgent : MonoBehaviour
{
    private WaypointProgressTracker tracker = null;

    [SerializeField, Range(0, 10)]
    protected float speed = 1;

    void Start()
    {
        tracker = GetComponent<WaypointProgressTracker>();
    }

    void Update()
    {
        Vector3 targetPosition = tracker.progressPoint.position + tracker.progressPoint.direction;
        transform.position = Vector3.MoveTowards( transform.position, targetPosition, speed * Time.deltaTime);
    }
}

解説動画

UnityでGoogle Cloud Natural Languageにアクセスする

APIキーが見えるのであくまでも実験用です※PHPだからクライアントには見えないか,,

流れ

Google Cloud Natural LanguageのAPIキーを取得

(がんばってとってください)

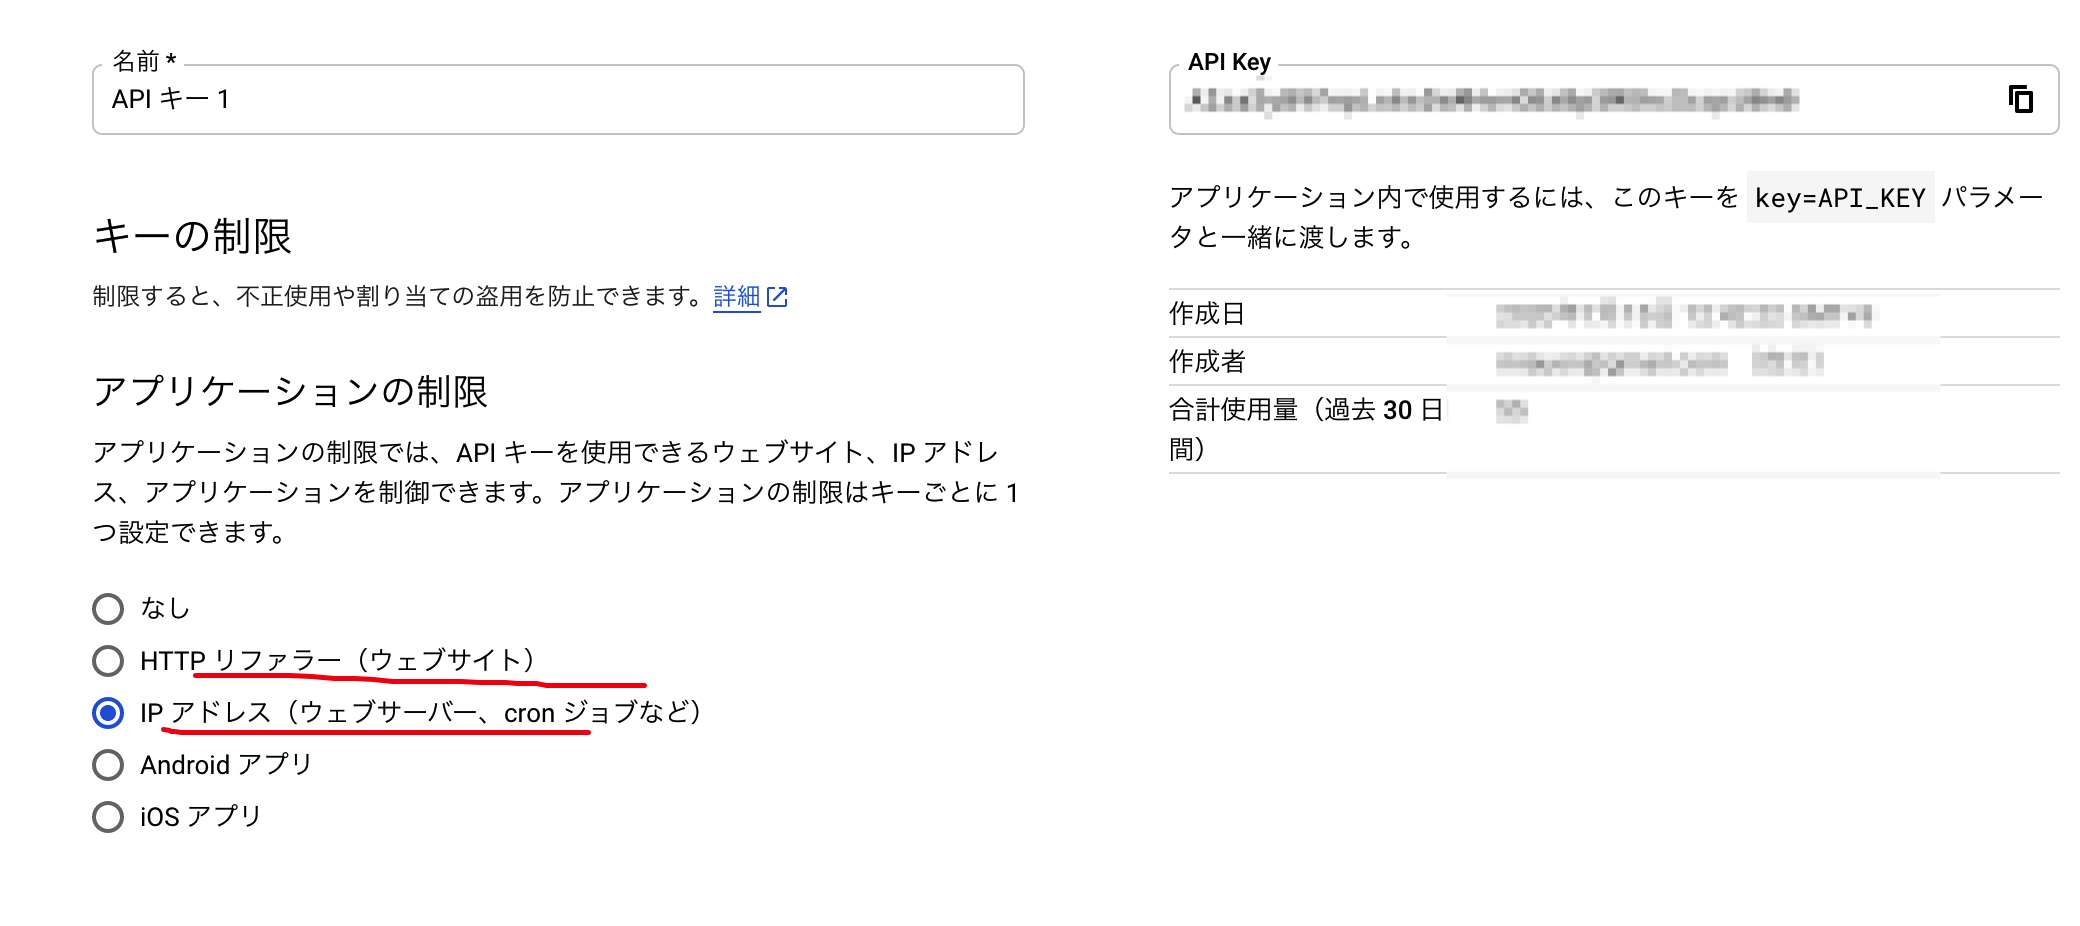
  1. 作成するとこんな画面がでてきます
  2. HTTPリファラかIPアドレス制限(サーバのIPアドレス)を使用します
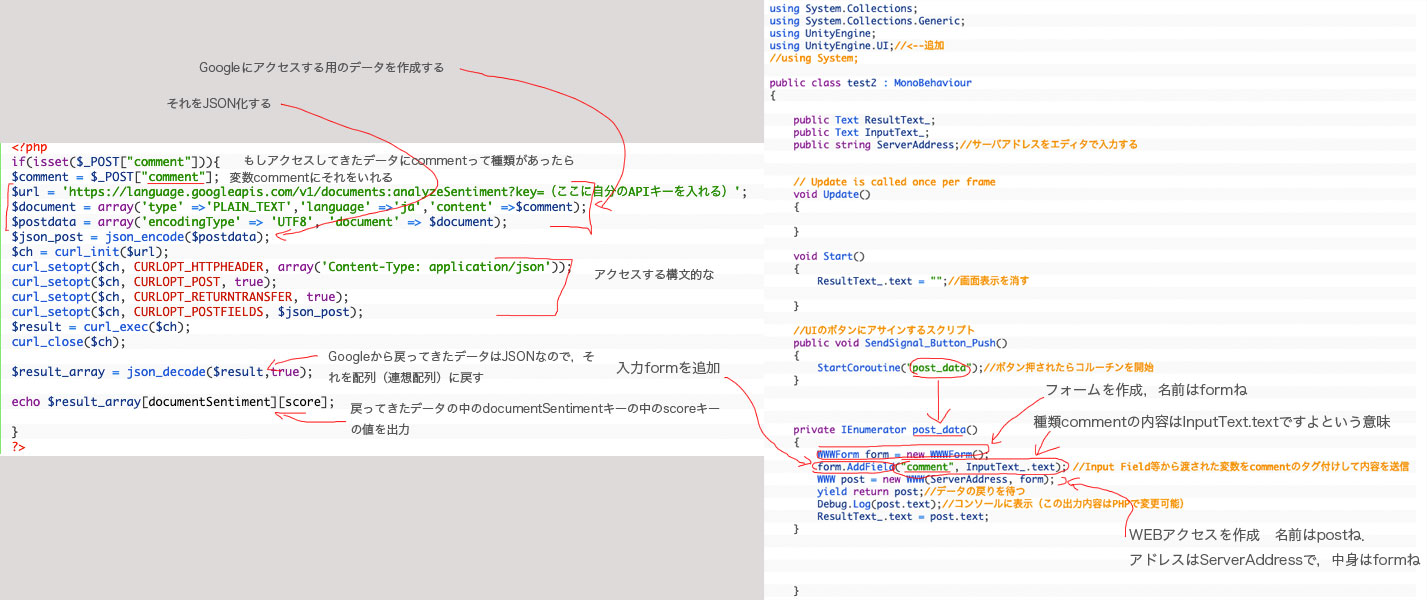
  3. PHPファイルを作成します(test2.php)
<?php
if(isset($_POST["comment"])){
$comment = $_POST["comment"];
$url = 'https://language.googleapis.com/v1/documents:analyzeSentiment?key=(ここに自分のAPIキーを入れる)';
$document = array('type' =>'PLAIN_TEXT','language' =>'ja','content' =>$comment);
$postdata = array('encodingType' => 'UTF8', 'document' => $document);
$json_post = json_encode($postdata);
$ch = curl_init($url);
curl_setopt($ch, CURLOPT_HTTPHEADER, array('Content-Type: application/json'));
curl_setopt($ch, CURLOPT_POST, true);
curl_setopt($ch, CURLOPT_RETURNTRANSFER, true);
curl_setopt($ch, CURLOPT_POSTFIELDS, $json_post);
$result = curl_exec($ch);
curl_close($ch);
 
$result_array = json_decode($result,true);
    
echo $result_array[documentSentiment][score];
 
}
?>

サーバにアップロードし,そのページまでのURLを確認します


Unit側のC#ファイルを作成します

using System.Collections;
using System.Collections.Generic;
using UnityEngine;
using UnityEngine.UI;//<--追加
//using System;

public class test2 : MonoBehaviour
{

    public Text ResultText_;
    public Text InputText_;
    public string ServerAddress;//サーバアドレスをエディタで入力する


    // Update is called once per frame
    void Update()
    {
        
    }

    void Start()
    {
        ResultText_.text = "";//画面表示を消す

    }

    //UIのボタンにアサインするスクリプト
    public void SendSignal_Button_Push()
    {
        StartCoroutine("post_data");//ボタン押されたらコルーチンを開始
    }


    private IEnumerator post_data()
    {
        WWWForm form = new WWWForm();
        form.AddField("comment", InputText_.text); //Input Field等から渡された変数をcommentのタグ付けして内容を送信
        WWW post = new WWW(ServerAddress, form);
        yield return post;//データの戻りを待つ
        Debug.Log(post.text);//コンソールに表示(この出力内容はPHPで変更可能)
        ResultText_.text = post.text;
    }


    }

Unityでの操作

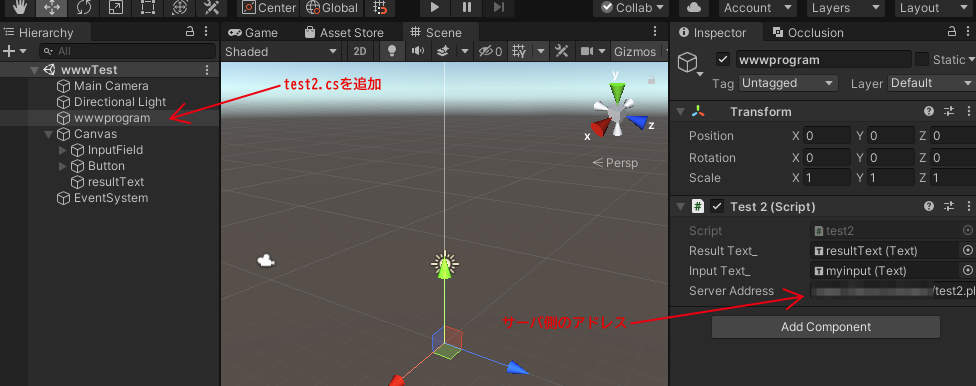
  1. Unityで空のGameObjectを作成し,test2.csを貼り付けます
  2. PHPへのURLを入力します
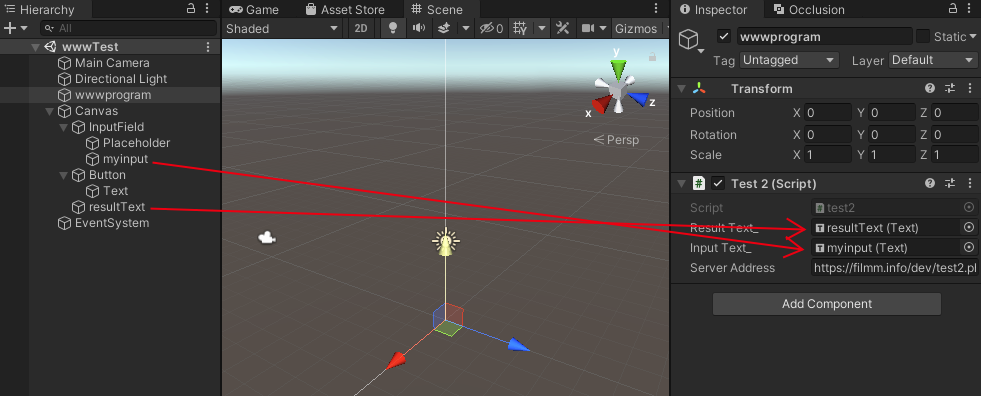
  3. GameObject>UI>InputFiledGameObject>UI>Textを作成し,下図のように割り当てます
  4. GameObject>UI>Buttonを作成し,Inspectorからボタンを押せるようにします
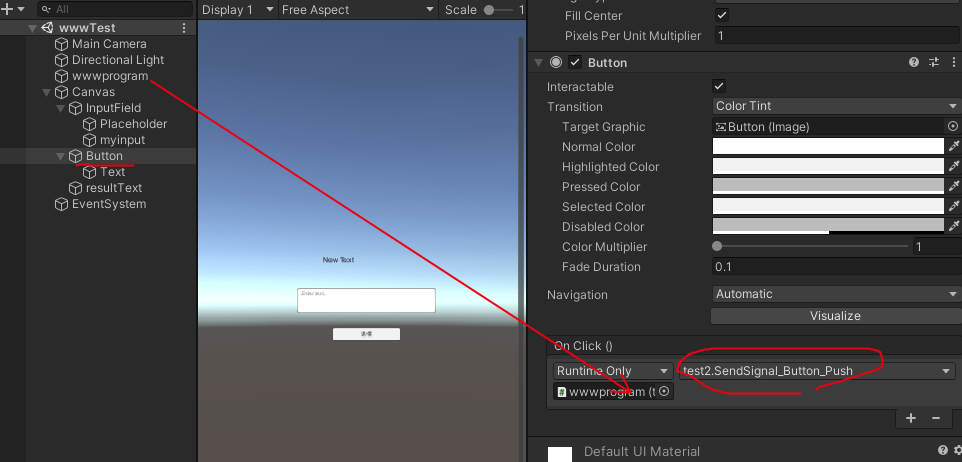
  5. InputFieldはMuli Line Newlineの設定します
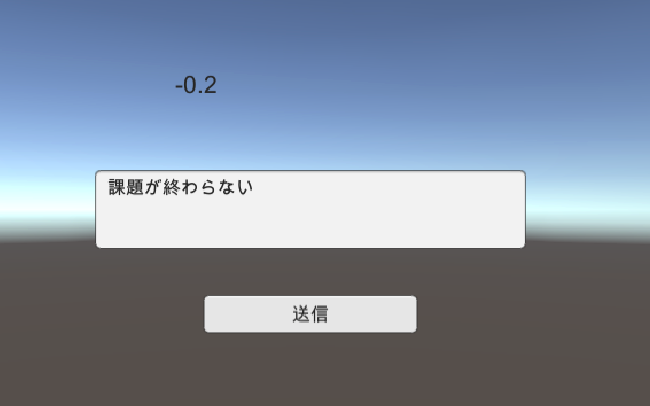
  6. Unityを再生し,文字を入力すると,感情が帰ってきます
  7. 「課題が終わらない」は-0.2でした


スクリプトのなんとなく対応みたいなの

取得してSE再生,壁に当たってSE再生

スクリプトのみ

using System.Collections;
using System.Collections.Generic;
using UnityEngine;
 
public class destroy_SE : MonoBehaviour
{
    public AudioClip impact;//音のファイル読み込み
    public AudioClip wallhit;
 
    AudioSource audioSource;//音の再生装置
 
    private void Start()
    {
        audioSource = GetComponent<AudioSource>();
    }
 
    //当たって消すパタン
    private void OnTriggerEnter(Collider other)
    {
 
        if(other.gameObject.tag == "wall")//タグがwallなら
        {
            //audioSource.PlayOneShot(wallhit, 0.7F);//impactを音量0.7で再生
 
        }
        else
        {
            Destroy(other.gameObject);
            audioSource.PlayOneShot(impact, 0.7F);//impactを音量0.7で再生
        }
        
 
        //点数を加算


        //加算した点数をUIに反映
 
    }
    //壁
    private void OnCollisionEnter(Collision collision)
    {
        if (collision.gameObject.tag == "wall")//タグがcollision なら
        {
            audioSource.PlayOneShot(wallhit, 0.7F);//wallhitを音量0.7で再生
 
        }
    }
 
}


Maya->Unity2019(4)


スクリプトの適用

chair.csは削除します.スクリプトを選択し,chairの歯車のアイコンからremove componentを選択して削除します.


次に,回転に対応したスクリプトを作成する.ファイル名はmove1.cs

using System.Collections;
using System.Collections.Generic;
using UnityEngine;

[RequireComponent(typeof(CharacterController))]
public class move1 : MonoBehaviour
{

	public float speed = 3.0F;
	public float rotateSpeed = 3.0F;
	public float gravity = 10f;
	public float jumpPower = 5;

	private Vector3 moveDirection;
	private CharacterController controller;

	void Start()
	{

		// コンポーネントの取得
		controller = GetComponent<CharacterController>();//キャラクターコントローラを取得し,変数contorllerに収納

	}

	void Update()
	{

		if (controller.isGrounded)//接地していれば
		{

			// 回転
			transform.Rotate(0, Input.GetAxis("Horizontal") * rotateSpeed, 0);

			// キャラクターのローカル空間での方向
			moveDirection = transform.transform.forward * speed * Input.GetAxis("Vertical");

			// ジャンプ
			if (Input.GetButtonDown("Jump")) moveDirection.y = jumpPower;

		}
		else
		{

			// ジャンプ落下
			moveDirection.y -= gravity * Time.deltaTime;

		}

		//移動させる
		controller.Move(moveDirection * Time.deltaTime);

	}

}


このスクリプトをイスのモデルにアサインします.


Maya->Unity2019(3)

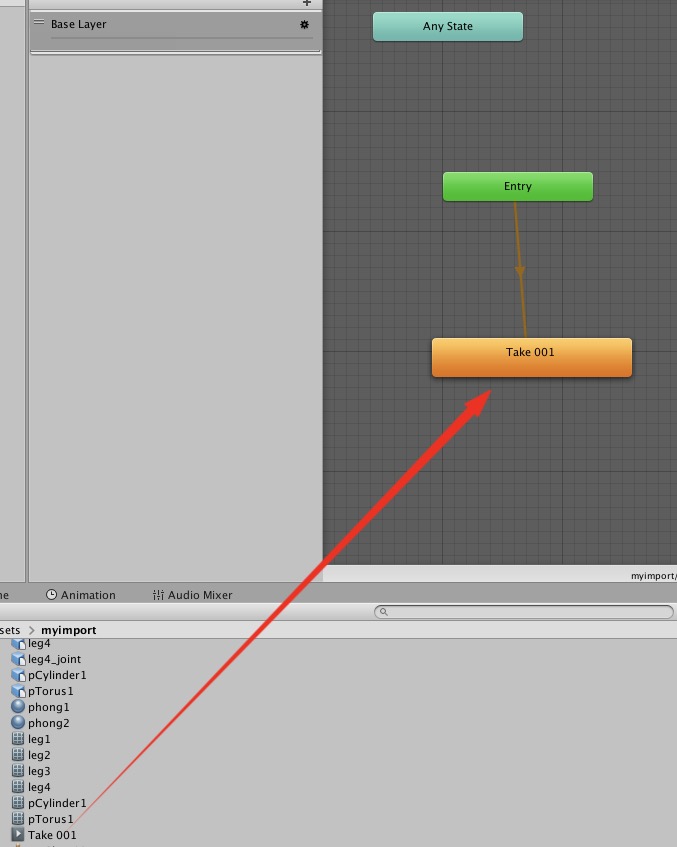
Animation Controllerの設定

  1. Assets>Create>AnimationControllerAnimationControllerを作成する.名前は何でもかまわない
  2. 作成したAnimationControllerをダブルクリックする
  3. Animation Controller画面が開かれる
  4. アセット内のイスの中にTake001というアニメーションファイルが入っているので,Animation Controllerにドロップする(勝手にEntryと接続される)
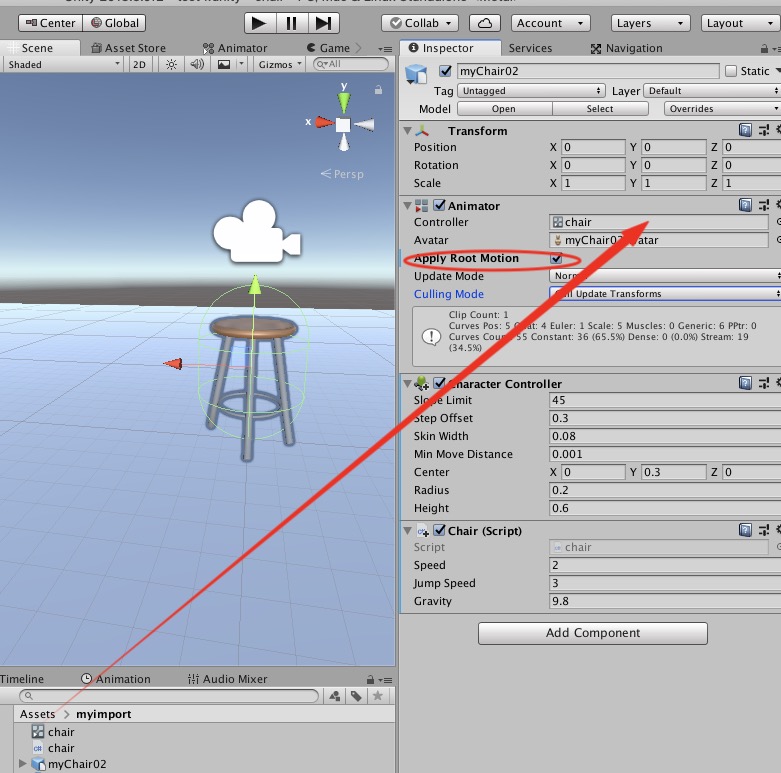
  5. ChairのAnimator作成したAnimation Controllerを入れる
  6. その際,Apply Rootmotionにチェックを入れること
  7. 再生してみる

Maya->Unity2019(2)

スクリプトを作成する


  1. キャラクタを操作するスクリプトを作成します
  2. アセット内で右クリック>Create>C# Scriptを選択
  3. ファイル名は chair にする
  4. 作成されたスクリプトを開く(Visual Studioなどが開く)
  5. 全部を以下に入れ替え,保存する
using System.Collections;
using System.Collections.Generic;
using UnityEngine;

public class chair : MonoBehaviour
{
    CharacterController characterController;

    public float speed = 2f;
    public float jumpSpeed = 3f;
    public float gravity = 9.8f;

    private Vector3 moveDirection = Vector3.zero;

    void Start()
    {
        characterController = GetComponent<CharacterController>();
    }

    void Update()
    {
        if (characterController.isGrounded)
        {
            moveDirection = new Vector3(Input.GetAxis("Horizontal"), 0.0f, Input.GetAxis("Vertical"));
            moveDirection *= speed;

            if (Input.GetKey(KeyCode.Space))
            {
                moveDirection.y = jumpSpeed;
            }

        }
        moveDirection.y -= gravity * Time.deltaTime;
        characterController.Move(moveDirection * Time.deltaTime);
    }
}
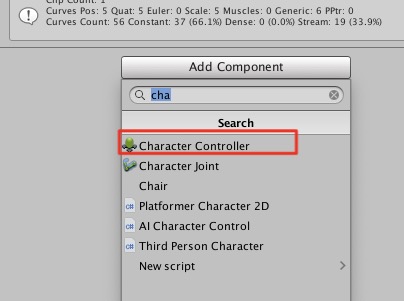
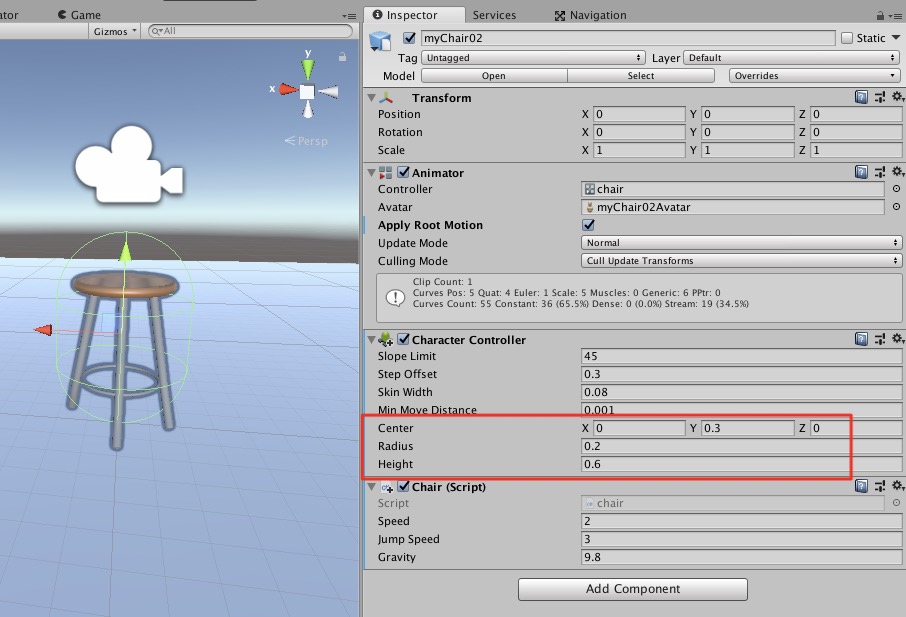
  1. 椅子を選び,Add ComponentからCharacter Controllerを探し出し追加する
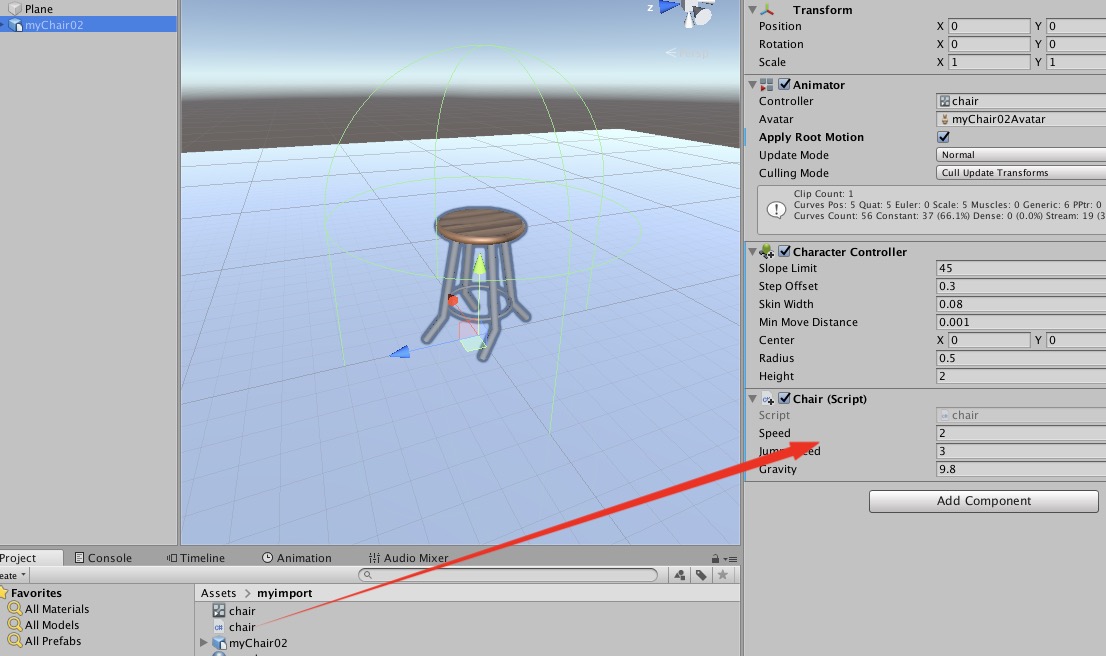
  2. Character Controllerの設定項目でCollider(衝突用簡易オブジェクト)の大きさを調整し,床面にめり込まないようにする(緑色のカプセルの大きさを調整する)
  3. 先ほど作成したchairのスクリプトも椅子に追加する

つぎへ

unity->Arduino->Unity開発メモ2019

UnitySerianHandloerのUnity2018で使えたやつ


SerialHandler.cs

using UnityEngine;
using System.Collections;
using System.IO.Ports;
using System.Threading;

public class SerialHandler : MonoBehaviour
{
    public delegate void SerialDataReceivedEventHandler(string message);
    public event SerialDataReceivedEventHandler OnDataReceived = delegate { };

    //ポート名
    //例
    //Linuxでは/dev/ttyUSB0
    //windowsではCOM1
    //Macでは/dev/tty.usbmodem1421など
    public string portName = "/dev/cu.usbmodem2101";//mac
    public int baudRate = 9600;

    private SerialPort serialPort_;
    private Thread thread_;
    private bool isRunning_ = false;

    private string message_;
    private bool isNewMessageReceived_ = false;

    void Awake()
    {
        Open();
    }

    void Update()
    {
        if (isNewMessageReceived_)
        {
            OnDataReceived(message_);
        }
        isNewMessageReceived_ = false;
    }

    void OnDestroy()
    {
        Close();
    }

    private void Open()
    {
        serialPort_ = new SerialPort(portName, baudRate, Parity.None, 8, StopBits.One);
        //または
        //serialPort_ = new SerialPort(portName, baudRate);
        serialPort_.ReadTimeout = 20;//Add this 2019
        serialPort_.Open();
        serialPort_.NewLine = "\n";//Add this 2019

        isRunning_ = true;

        thread_ = new Thread(Read);
        thread_.Start();
    }

    private void Close()
    {
        //isNewMessageReceived_ = false;
        isRunning_ = false;

        if (thread_ != null && thread_.IsAlive)
        {
            thread_.Join();
        }

        if (serialPort_ != null && serialPort_.IsOpen)
        {
            serialPort_.Close();
            serialPort_.Dispose();
        }
    }

    private void Read()
    {
        while (isRunning_ && serialPort_ != null && serialPort_.IsOpen)
        {
            try
            {
                message_ = serialPort_.ReadLine();
                isNewMessageReceived_ = true;
            }
            catch (System.Exception e)
            {
            //    Debug.LogWarning(e.Message);
            }
        }
    }

    public void Write(string message)
    {
        try
        {
            serialPort_.Write(message);
        }
        catch (System.Exception e)
        {
            Debug.LogWarning(e.Message);
        }
    }
}


Unityボタン側スクリプト

Btn.cs

using System.Collections;
using System.Collections.Generic;
using UnityEngine;
using UnityEngine.UI;

public class Btn : MonoBehaviour
{
    //先ほど作成したクラス
    public SerialHandler serialHandler;


  void Start()
    {
        //信号を受信したときに、そのメッセージの処理を行う
        serialHandler.OnDataReceived += OnDataReceived;
    }

    void Updata()
    {
        //文字列を送信
       // serialHandler.Write("hogehoge");
    }

    //受信した信号(message)に対する処理
    void OnDataReceived(string message)
    {
        var data = message.Split(
                new string[] { "\t" }, System.StringSplitOptions.None);
        if (data.Length < 2) return;

        try
        {
         
        }
        catch (System.Exception e)
        {
            Debug.LogWarning(e.Message);
        }
    }


    /////ここから追加します
    /// 
    /// 
    /// 
    ///
    public void sendOn()
    {
        //Arduinoに文字列onを送る
        serialHandler.Write("4");
    }

    public void sendOff()
    {
        //
        serialHandler.Write("5");
    }
    public void ledOn()
    {
        //
        serialHandler.Write("6");
    }

    public void ledOff()
    {
        //
        serialHandler.Write("7");
    }

}


Arduino側コード

#include <Servo.h>
const int LED_PIN = 13;
int SERVO_SOCKET = 9;
Servo servo;
String InByte_strings;
int InByte;

void setup() {
 Serial.begin(9600);
 pinMode( LED_PIN, OUTPUT );
servo.attach( SERVO_SOCKET );
}

void loop() {
  
  if(Serial.available()>0){
    InByte_strings=Serial.readStringUntil(';');
    InByte=InByte_strings.toInt();
    Serial.println(InByte);

     switch (InByte){
    case 4:
      servo.write( 90 );
      break;
    case 5:
      servo.write( 180 );
      break;
      case 6:
      digitalWrite(LED_PIN,HIGH);
      break;
      case 7:
      digitalWrite(LED_PIN,LOW);
      break;
  }
}
}


サンタゲーム用スクリプト

サンタゲームのメインスクリプト.単眼VRで照準に入ったら色を変えたり,スコアを表示したり,残時間を表示するなど.

using System.Collections;
using System.Collections.Generic;
using UnityEngine;
using UnityEngine.UI;
using UnityEngine.SceneManagement;


public class scope: MonoBehaviour {

    [Header("クロスヘア(照準)の画像をつけたUIを入れる")]
    public Image aimPointImage;
    [Header("スライダー(補足時間目安)のUIを入れる")]
    public Slider myslider;//UIのスライダー
    float slideValue = 0f;//スライダーの値用の変数
    bool soundBool = false;//音を連続再生されるのを防止するBool
    [Header("何点ゲットしたかを表示する画像用のUI")]
    public Image pointImage;//何点ゲットしたかを表示する画像用のUI
    [Header("上のImageが入っているGameObject")]
    public GameObject imageObj;//上のImageが入っているGameObject

    [Header("10点用画像")]
    public Sprite point10;//Imageに割り当てる画像(スプライト10点用以下同じ)
    [Header("20点用画像")]
    public Sprite point20;
    [Header("50点用画像")]
    public Sprite point50;

    [Header("クロスヘアにロックした時の音")]
    public AudioClip scopesound;//クロスヘアにロックした時の音
    [Header("プレゼントをゲットした音")]
    public AudioClip getsound;//プレゼントをゲットした音
    AudioSource audio;//オーディオソース用
    AudioSource audio2;

    [Header("ポイント表示用UI")]
    public Text pointTxt;//文字変数ポイント用
    [Header("時間表示用UI")]
    public Text timeText;//時間表示用文字
    int mypoint;//ポイント用Int
    [Header("初期残時間")]
    public int mytime;//時間用


    private void Start()
    {
        AudioSource[] audioSources = gameObject.GetComponents<AudioSource>();//Maincameraにアサインされている複数のAudioSourceを取得し配列に入れる

        audio = audioSources[0];//一つ目のオーディオソースの名前をaudioに
        audio2 = audioSources[1];
        imageObj.SetActive(false);//ポイント取得画像パネルを隠す

        mypoint = 0;
        pointTxt.text = mypoint.ToString();//UIの文字を初期化する
        timeText.text = mytime.ToString();//上と同じ
        Invoke("startTimer", 3f);//3秒後にタイマースタート
    }


    void FixedUpdate()
    {

        // Rayを飛ばす
        Ray ray = new Ray(transform.position, transform.forward);

        // outパラメータ用に、Rayのヒット情報を取得するための変数を用意
        RaycastHit hit;


        // Rayのhit情報を取得する

        if (Physics.SphereCast(ray, 0.5f, out hit, 80.0f)){//Rayで球を飛ばす

            // Rayがhitしたオブジェクトのタグ名を取得
            string hitTag = hit.collider.tag;

            // タグの名前がpresentだったら、照準の色が変わる
            if ((hitTag.Equals("present"))){
                //照準を赤に変える
                aimPointImage.color = new Color(1.0f, 0.0f, 0.0f, 1.0f);

                slideValue += 1.5f;//スライドバー用の値をアップさせる
                myslider.value = slideValue;//スライドバーの値をセットする

                if(!soundBool){//連打再生されないようにBoolで飛ばす
                    soundBool = true;
                    audio.PlayOneShot(scopesound, 0.2f);//スコープ用の音を再生する
                }


                //99越えたら消す
                if(slideValue > 99){
                    pointget(hit.collider.gameObject);
                    Destroy(hit.collider.gameObject);
                    soundBool = false;//再び再生できるようにする


                }

            }else{
                // present以外では水色に
                aimPointImage.color = new Color(0.0f, 1.0f, 1.0f, 1.0f);
                slideValue = 0f;//スライド値を0にする
                myslider.value = slideValue;//その値をスライドにセットする
                audio.Stop();//音再生停止
                soundBool = false;
            }

        }else{
            // Rayがヒットしていない場合は水色に
            aimPointImage.color = new Color(0.0f, 1.0f, 1.0f, 1.0f);
            slideValue = 0f;
            myslider.value = slideValue;
            audio.Stop();
            soundBool = false;
        }
    }


    void pointget(GameObject go){
        //音再生
        audio2.PlayOneShot(getsound);
        //ポイント表示
        //InstatiateしたPrefab名で足す点数を変えている
        //と同時にポイント用画像を選定してセットする
  
        if (go.name.Contains("PresentYel"))
        {
            pointImage.sprite = point10;
            mypoint += 10;
        }
        else if (go.name.Contains("PresentBlue"))
        {
            pointImage.sprite = point20;
            mypoint += 20;
        }
        else if (go.name.Contains("PresentRed"))
        {
            pointImage.sprite = point50;
            mypoint += 50;
        }

        PlayerPrefs.SetInt("score", mypoint);//End画面用にPlayerPrefsに得点をセットする
        imageObj.SetActive(true);//得点画面を出す
        Invoke("hidePoint", 1f);//1秒後にポイント画面を隠す
        pointTxt.text = mypoint.ToString();//ポイントを文字列に変更して表示
    }

    void hidePoint(){
        imageObj.SetActive(false);//ポイント画面を隠す
    }


    void startTimer(){
        
        StartCoroutine ("myTimer"); //コルーチンをスタートする
    }


    IEnumerator myTimer()
    {
        while (true)
        {
            mytime--;//初期設定の120秒を減らす

            if(mytime < 10){//10秒未満になったら残り時間を変える
                timeText.color = new Color(1.0f, 0.0f, 0.0f, 1.0f);//文字を赤色に
            }else{
                timeText.color = new Color(1.0f, 1.0f, 1.0f, 1.0f);//文字を白色に
            }

            timeText.text = mytime.ToString();

            yield return new WaitForSeconds(1.0f);//1秒間待つ


            //終了処理
            if(mytime < 1){
                Invoke("showScore", 2f);
                yield break;
                //終了処理へ

            }


        }
    }

    //やめるボタン用
    public void goHomeBtn(){
        SceneManager.LoadScene("op");
    }

    //タイムアップ処理
    void showScore(){
        //スコア表示画面へ
        SceneManager.LoadScene("end");
    }
}

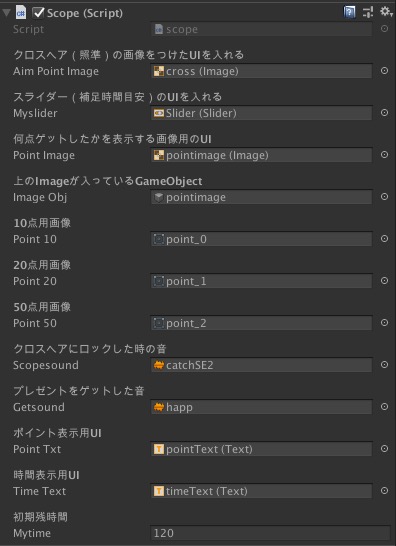
スクリプトの使い方です.説明文を入れていますので参考に.

スクリプトに説明文を入れています

単眼VR用スクリプト

using System.Collections;
using System.Collections.Generic;
using UnityEngine;

public class gyroCam : MonoBehaviour {

	// Use this for initialization
	void Start () {
		Input.gyro.enabled = true;
	}
	
	// 横位置用
	void Update () {
		transform.rotation = Quaternion.AngleAxis(90.0f,Vector3.right)*Input.gyro.attitude*Quaternion.AngleAxis(180.0f,Vector3.forward);
	}
}

スマートホンのジャイロに応じてカメラが移動します.Androidはジャイロが搭載されていない機種も多いので使えないこともあります.

動作例

ゲームオブジェクトを巡回させる(AI無し)

スクリプトがアサインされたゲームオブジェクトを毎回決まったルートを巡回させます.

下のスクリプトをPatrol.csとして保存しUnityに読み込みます.

using UnityEngine;
using System.Collections;

public class Patrol : MonoBehaviour
{

    [SerializeField, TooltipAttribute("経由地点の数を入力し,シーン上に配置した空のオブジェクトをアサインします")]
    public Transform[] wayPoints;

    public Transform target;
    public float speed;

    public int currentRoot;


    void Update()
    {

        //配列に入れたTransformを順に巡る.AIを使っていればスムーズに曲がるがこれは鋭角に曲がる

        float step = speed * Time.deltaTime;
        transform.position = Vector3.MoveTowards(transform.position, wayPoints[currentRoot].position, step);


        Vector3 pos = wayPoints[currentRoot].position;

        float test = Vector3.Distance(target.position, pos);
        transform.LookAt(pos);
                    
        if(Vector3.Distance(transform.position, pos) < 0.5f)
        {
          currentRoot = (currentRoot < wayPoints.Length - 1) ? currentRoot + 1 : 0;
        }

    }
}

シーン内に巡回するGameObjectを配置します.

図ではCubeを選択しています

このGameObjectにPatrol.csをアサインします.

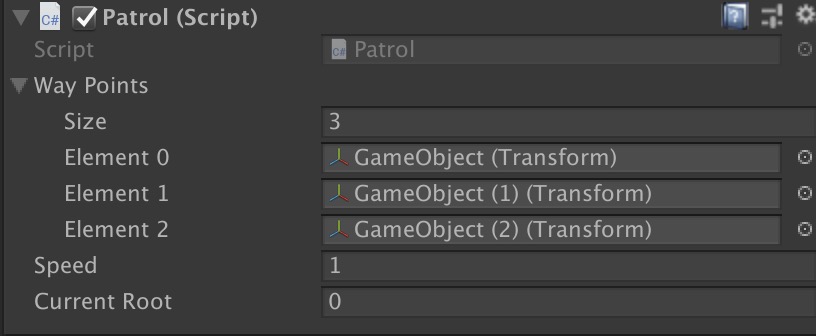
Sizeは巡回箇所の数で,ここに数字を入れると下に入力フィールドが現れます.Speedには適当な数字を入れておきます.

Elementには GameObject>CreateEmptyで作成した空のオブジェクト(位置情報のみ)を配置いれます.

これで再生すると,Patrol.csをアサインしたGameObjectがWayPointsを巡回するようになります.