「授業用」カテゴリーアーカイブ

取得してSE再生,壁に当たってSE再生

スクリプトのみ

using System.Collections;
using System.Collections.Generic;
using UnityEngine;
 
public class destroy_SE : MonoBehaviour
{
    public AudioClip impact;//音のファイル読み込み
    public AudioClip wallhit;
 
    AudioSource audioSource;//音の再生装置
 
    private void Start()
    {
        audioSource = GetComponent<AudioSource>();
    }
 
    //当たって消すパタン
    private void OnTriggerEnter(Collider other)
    {
 
        if(other.gameObject.tag == "wall")//タグがwallなら
        {
            //audioSource.PlayOneShot(wallhit, 0.7F);//impactを音量0.7で再生
 
        }
        else
        {
            Destroy(other.gameObject);
            audioSource.PlayOneShot(impact, 0.7F);//impactを音量0.7で再生
        }
        
 
        //点数を加算


        //加算した点数をUIに反映
 
    }
    //壁
    private void OnCollisionEnter(Collision collision)
    {
        if (collision.gameObject.tag == "wall")//タグがcollision なら
        {
            audioSource.PlayOneShot(wallhit, 0.7F);//wallhitを音量0.7で再生
 
        }
    }
 
}


はじめてのUnity2019−変更箇所

はじめてのUnityのチュートリアルサイト変更に伴い,取りこぼしている点について補足します.

変更後のサイト−>https://learn.unity.com/project/yu-zhuan-gashi?language=ja


この後の作業は以下の通りです

UIを作成>UI用のスクリプトを作成>ゲーム実行

続きを読む はじめてのUnity2019−変更箇所

Maya->Unity2019(4)


スクリプトの適用

chair.csは削除します.スクリプトを選択し,chairの歯車のアイコンからremove componentを選択して削除します.


次に,回転に対応したスクリプトを作成する.ファイル名はmove1.cs

using System.Collections;
using System.Collections.Generic;
using UnityEngine;

[RequireComponent(typeof(CharacterController))]
public class move1 : MonoBehaviour
{

	public float speed = 3.0F;
	public float rotateSpeed = 3.0F;
	public float gravity = 10f;
	public float jumpPower = 5;

	private Vector3 moveDirection;
	private CharacterController controller;

	void Start()
	{

		// コンポーネントの取得
		controller = GetComponent<CharacterController>();//キャラクターコントローラを取得し,変数contorllerに収納

	}

	void Update()
	{

		if (controller.isGrounded)//接地していれば
		{

			// 回転
			transform.Rotate(0, Input.GetAxis("Horizontal") * rotateSpeed, 0);

			// キャラクターのローカル空間での方向
			moveDirection = transform.transform.forward * speed * Input.GetAxis("Vertical");

			// ジャンプ
			if (Input.GetButtonDown("Jump")) moveDirection.y = jumpPower;

		}
		else
		{

			// ジャンプ落下
			moveDirection.y -= gravity * Time.deltaTime;

		}

		//移動させる
		controller.Move(moveDirection * Time.deltaTime);

	}

}


このスクリプトをイスのモデルにアサインします.


Maya->Unity2019(3)

Animation Controllerの設定

  1. Assets>Create>AnimationControllerAnimationControllerを作成する.名前は何でもかまわない
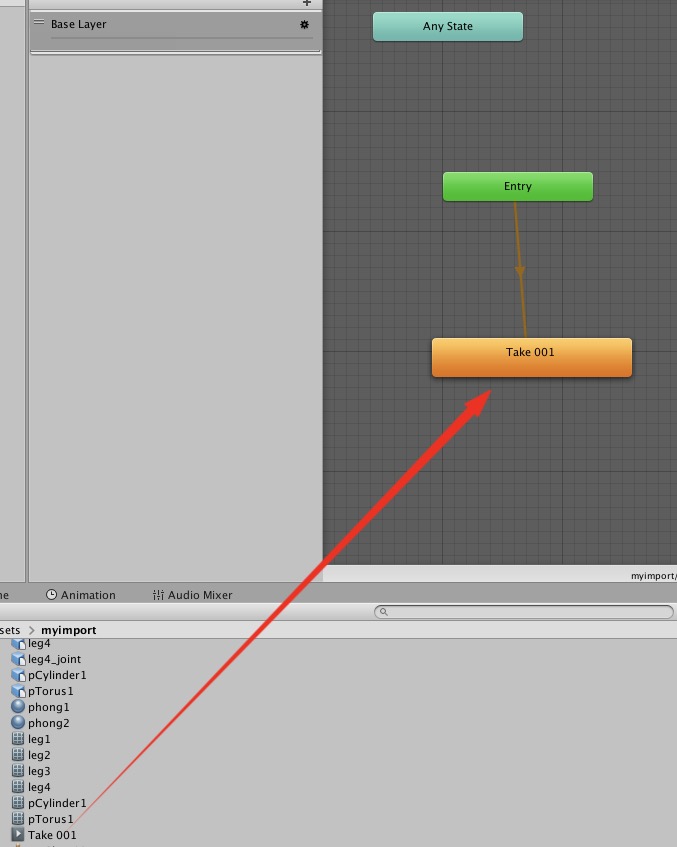
  2. 作成したAnimationControllerをダブルクリックする
  3. Animation Controller画面が開かれる
  4. アセット内のイスの中にTake001というアニメーションファイルが入っているので,Animation Controllerにドロップする(勝手にEntryと接続される)
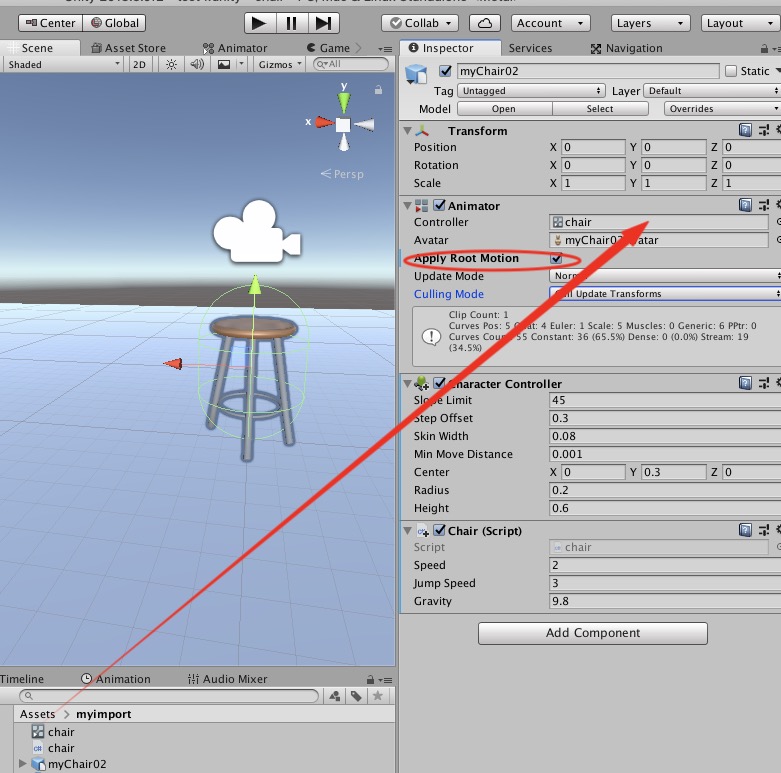
  5. ChairのAnimator作成したAnimation Controllerを入れる
  6. その際,Apply Rootmotionにチェックを入れること
  7. 再生してみる

Maya->Unity2019(2)

スクリプトを作成する


  1. キャラクタを操作するスクリプトを作成します
  2. アセット内で右クリック>Create>C# Scriptを選択
  3. ファイル名は chair にする
  4. 作成されたスクリプトを開く(Visual Studioなどが開く)
  5. 全部を以下に入れ替え,保存する
using System.Collections;
using System.Collections.Generic;
using UnityEngine;

public class chair : MonoBehaviour
{
    CharacterController characterController;

    public float speed = 2f;
    public float jumpSpeed = 3f;
    public float gravity = 9.8f;

    private Vector3 moveDirection = Vector3.zero;

    void Start()
    {
        characterController = GetComponent<CharacterController>();
    }

    void Update()
    {
        if (characterController.isGrounded)
        {
            moveDirection = new Vector3(Input.GetAxis("Horizontal"), 0.0f, Input.GetAxis("Vertical"));
            moveDirection *= speed;

            if (Input.GetKey(KeyCode.Space))
            {
                moveDirection.y = jumpSpeed;
            }

        }
        moveDirection.y -= gravity * Time.deltaTime;
        characterController.Move(moveDirection * Time.deltaTime);
    }
}
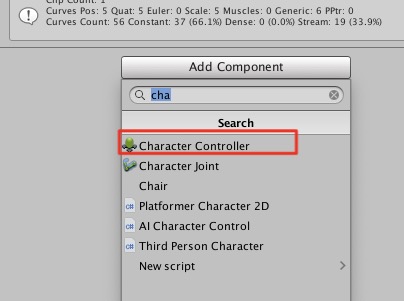
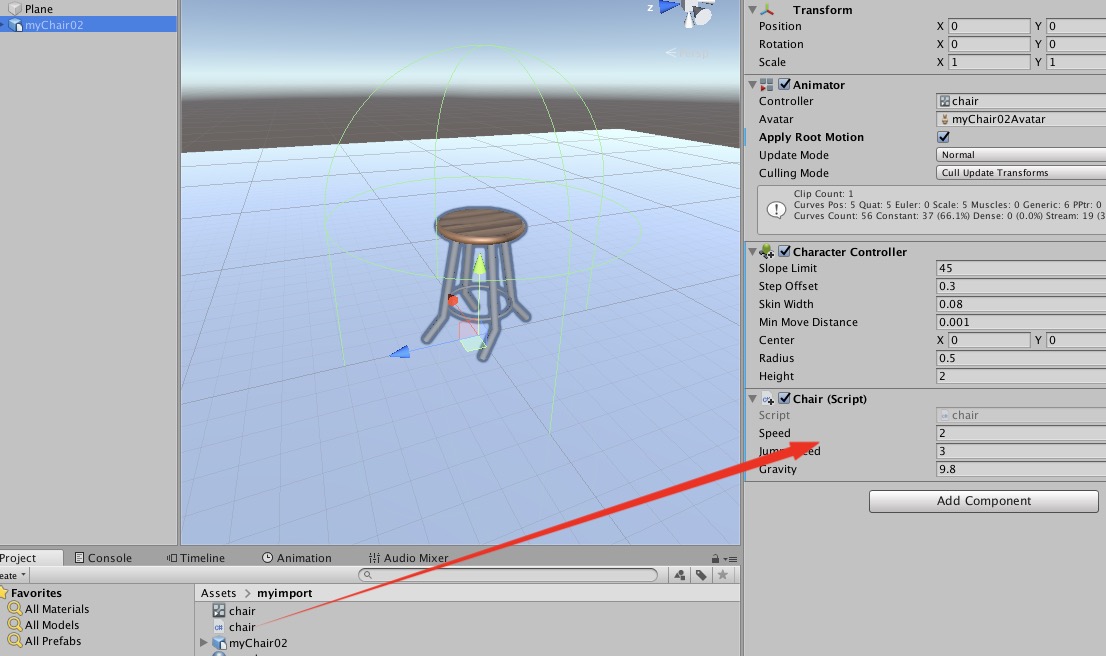
  1. 椅子を選び,Add ComponentからCharacter Controllerを探し出し追加する
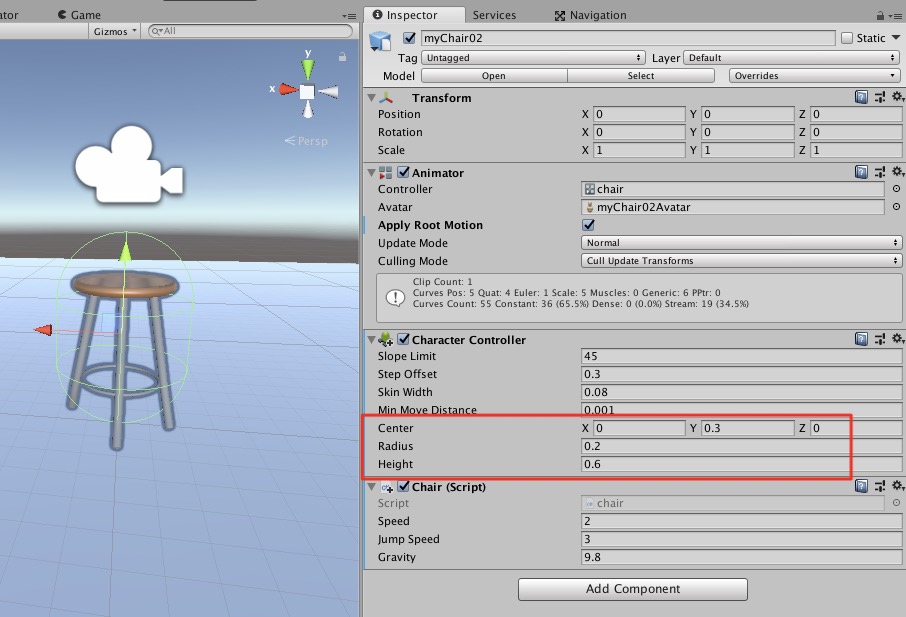
  2. Character Controllerの設定項目でCollider(衝突用簡易オブジェクト)の大きさを調整し,床面にめり込まないようにする(緑色のカプセルの大きさを調整する)
  3. 先ほど作成したchairのスクリプトも椅子に追加する

つぎへ

Maya->Unity2019(1)


以下も参考に

FBX Exporterが見つからないとき−>ここ

2018バージョン(IKを使用している場合)−>ここ


Maya→FBXに出力

Mayaで作成したファイルをUnityに読み込むには,FBXへの出力を選択し、FBX形式のファイルで出力し,それをUnity側で読み込みます.


今回はFKで作成したアニメーションを書き出します.IKを使った場合は別の方法となりますので,注意してください

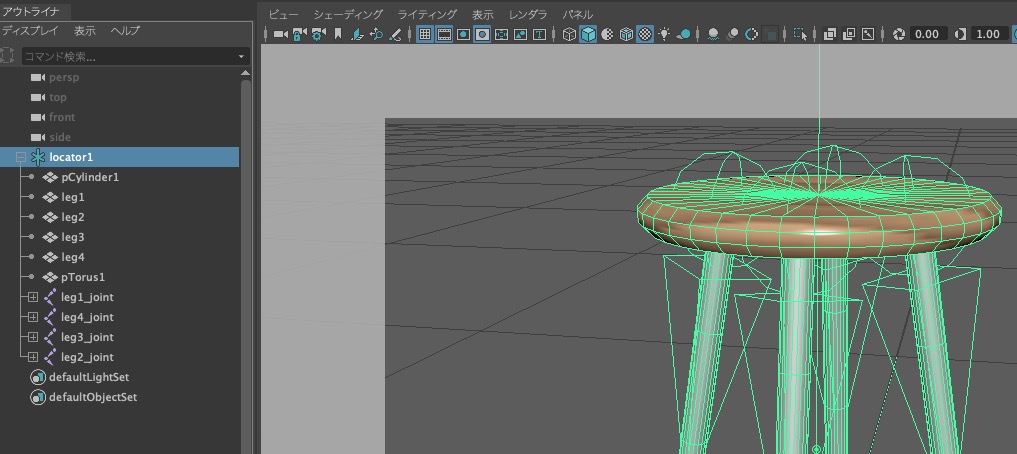
  1. 椅子の最上位の階層を選択します
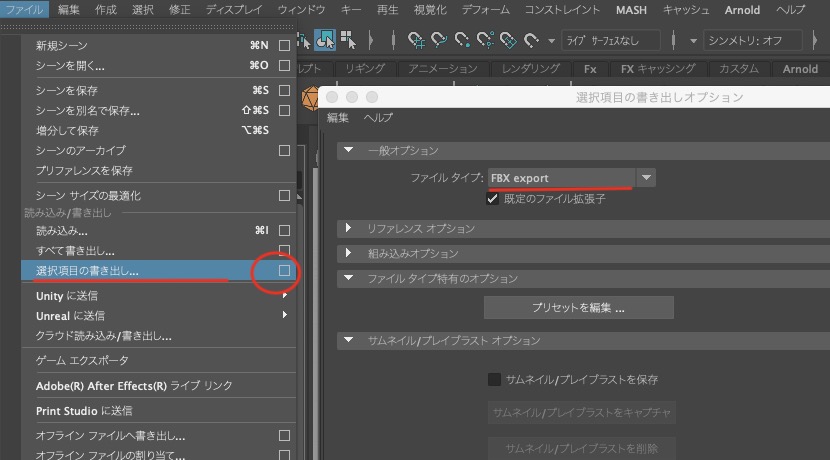
  2. ファイル>選択項目の書き出しのオプション□を選択します
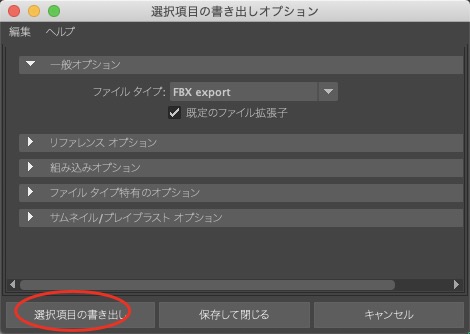
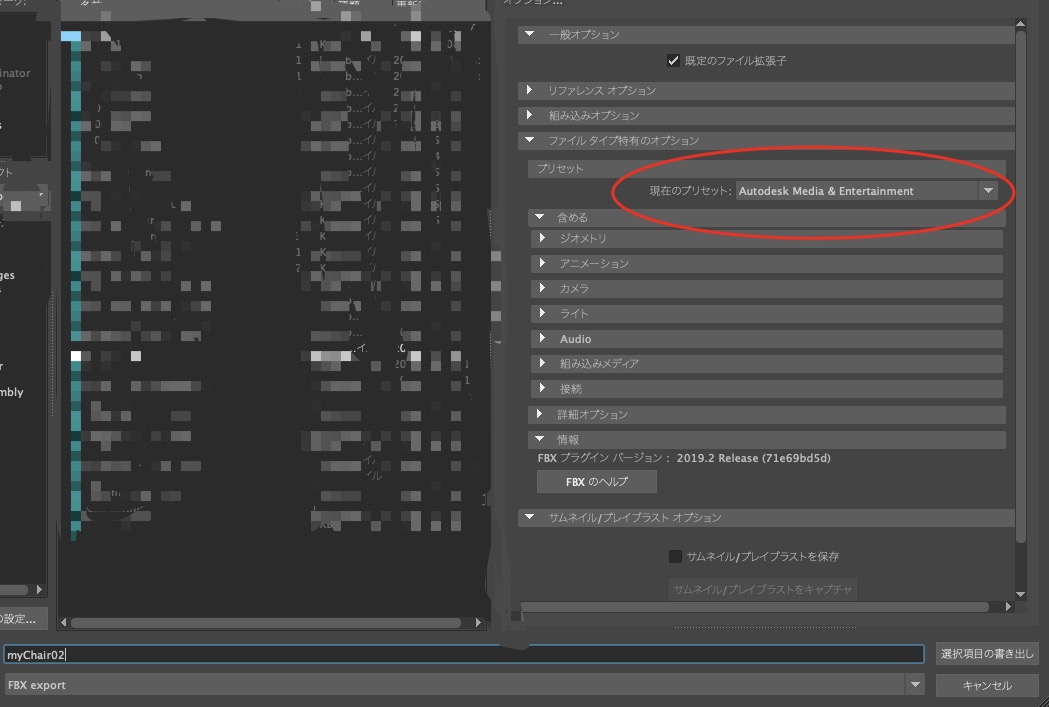
  3. 選択項目の書き出しオプションが表示されるので,ファイルタイプをFBX exportにし,選択項目の書き出しをクリック
  4. 現在のプリセットがAutodesk Media Entertainment になっていることを確認し,ファイル名をつけて保存する
  5. ファイル拡張子が.fbxになっていることを確認する
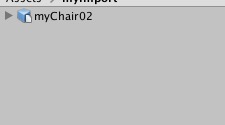
  6. 保存したファイルをUnityに読み込む
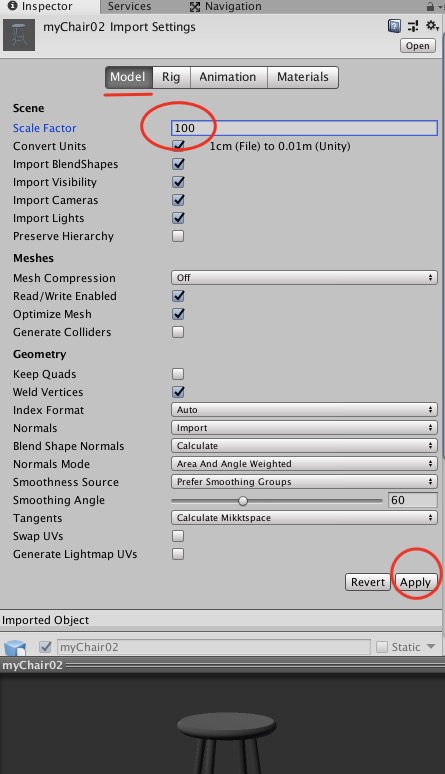
  7. 読み込んだファイルを選択し,InspectorのModelのタブを選択
  8. Scale Factorを100にし,Applyをクリック
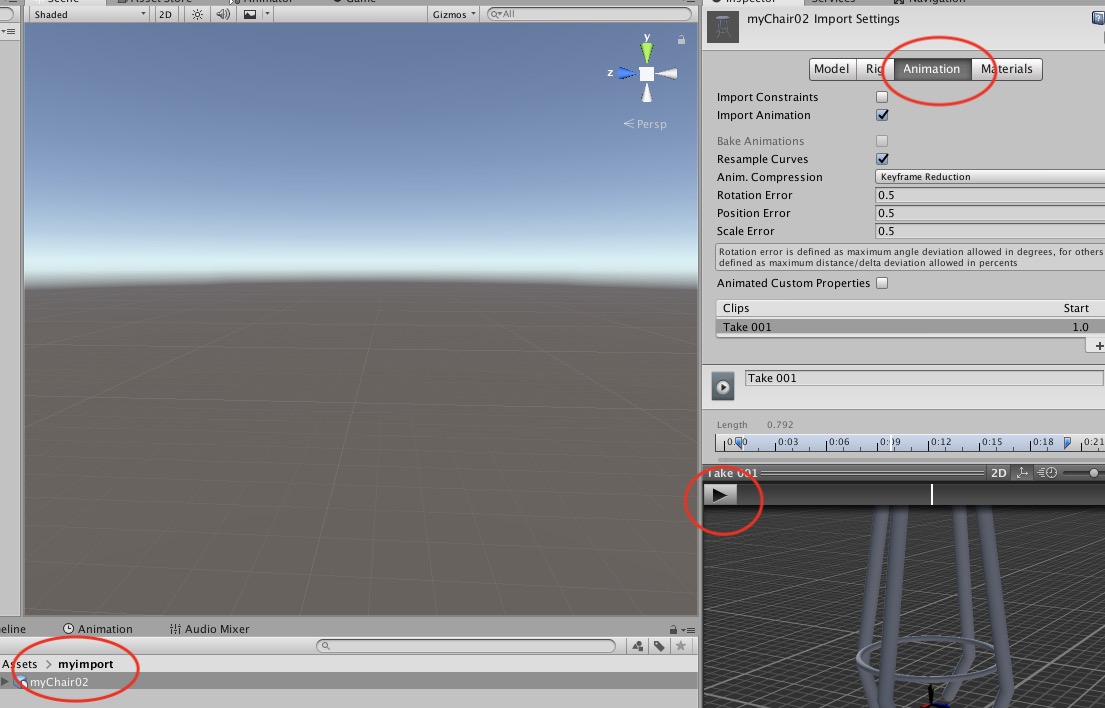
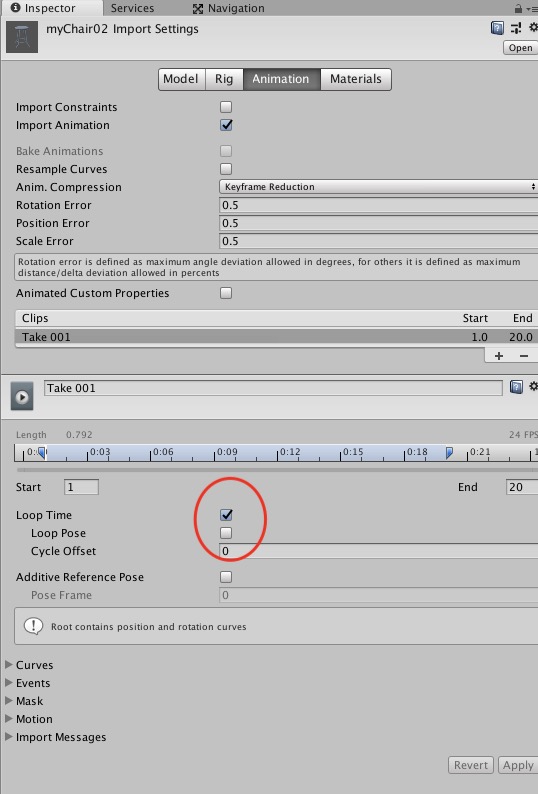
  9. つづいてAnimationのタブを選択し,アニメーションが再生されるか確認する
  10. Loop Timeにチェックを入れ,Applyをクリックしておくこと
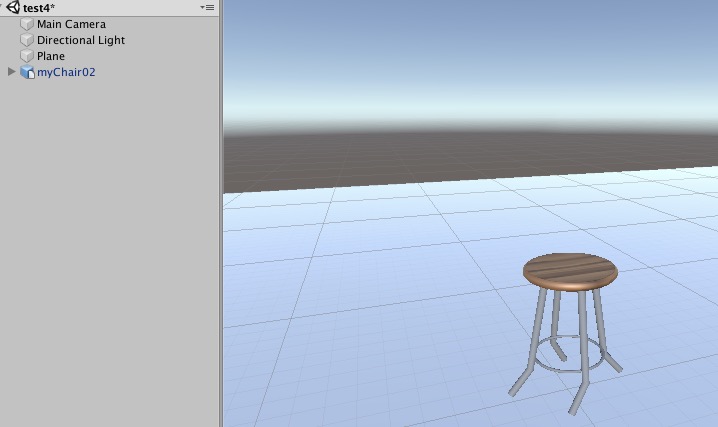
  11. Planeなどを作成し,その上に椅子を配置してみる
    椅子の木目が消えていますが,次のステップで読み込みます


Mayaのテクスチャを書き出す

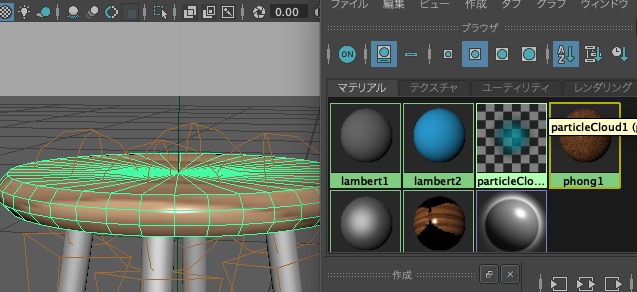
  1. Mayaに戻り,椅子の座面オブジェクトと,ハイパーシェードの適用したマテリアル両方を選択する
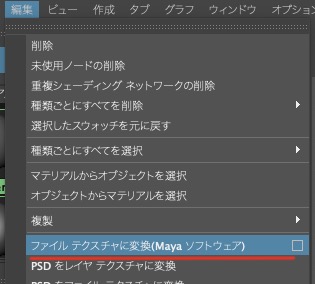
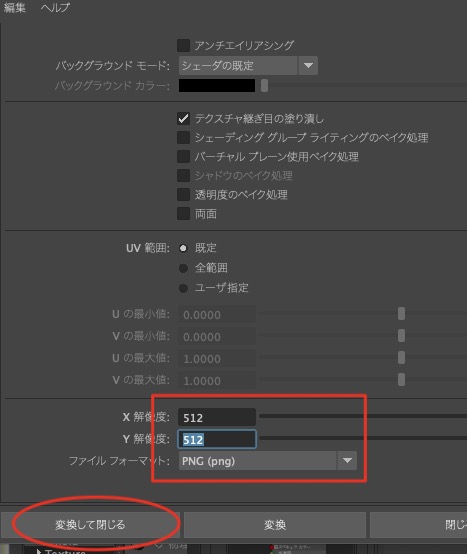
  2. 編集>ファイルテクスチャに変換□を選択
  3. X,Y解像度を512に,ファイルフォーマットをPNGにし,保存して閉じる
  4. これによって作成されたテクスチャ画像は,MayaプロジェクトフォルダのSourceimageフォルダに入っているので,これをUnityに読みこむ
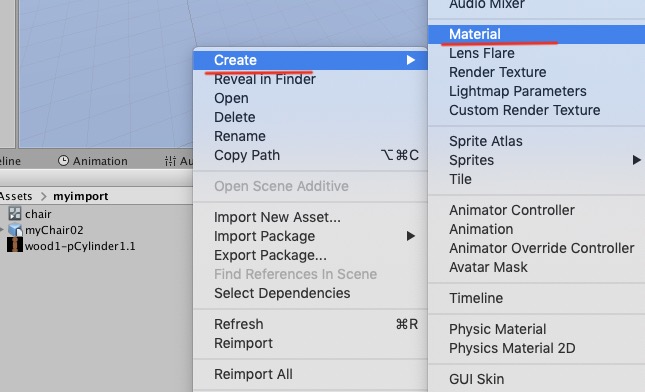
  5. アセット内で右クリック>Create>Materialで,マテリアルを作成
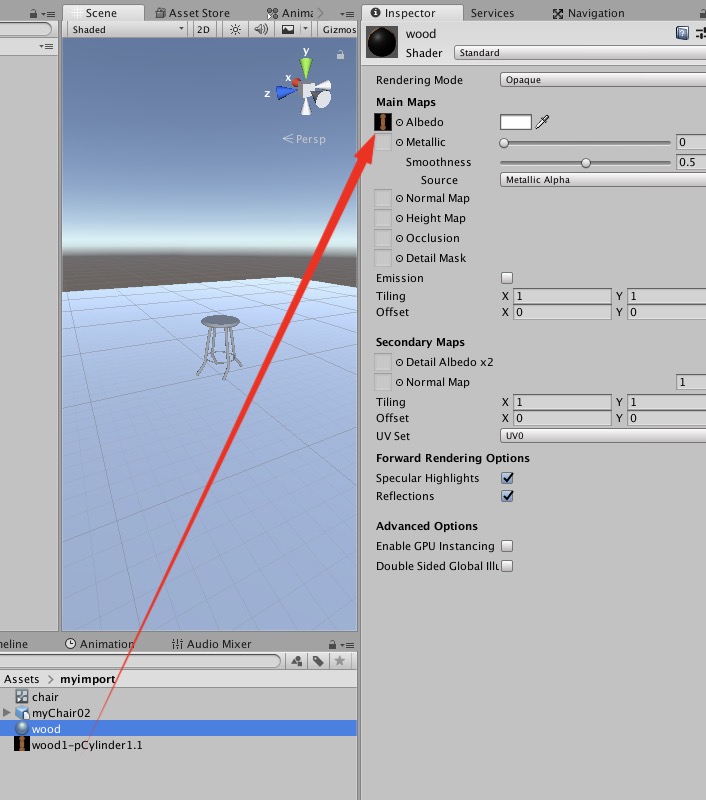
  6. Albedoの隣に読み込んだテクスチャをドロップする
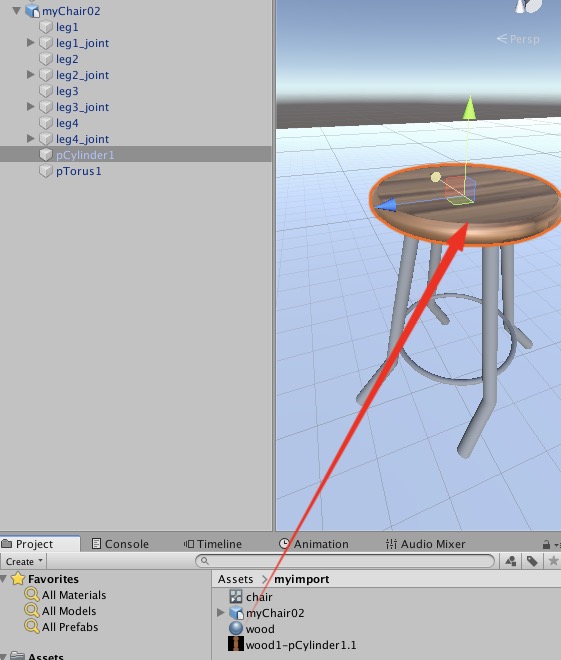
  7. 作成したマテリアルを椅子の座面にアサインする
  8. 椅子の座面が木目になりました

つぎ

unity->Arduino->Unity開発メモ2019

UnitySerianHandloerのUnity2018で使えたやつ


SerialHandler.cs

using UnityEngine;
using System.Collections;
using System.IO.Ports;
using System.Threading;

public class SerialHandler : MonoBehaviour
{
    public delegate void SerialDataReceivedEventHandler(string message);
    public event SerialDataReceivedEventHandler OnDataReceived = delegate { };

    //ポート名
    //例
    //Linuxでは/dev/ttyUSB0
    //windowsではCOM1
    //Macでは/dev/tty.usbmodem1421など
    public string portName = "/dev/cu.usbmodem2101";//mac
    public int baudRate = 9600;

    private SerialPort serialPort_;
    private Thread thread_;
    private bool isRunning_ = false;

    private string message_;
    private bool isNewMessageReceived_ = false;

    void Awake()
    {
        Open();
    }

    void Update()
    {
        if (isNewMessageReceived_)
        {
            OnDataReceived(message_);
        }
        isNewMessageReceived_ = false;
    }

    void OnDestroy()
    {
        Close();
    }

    private void Open()
    {
        serialPort_ = new SerialPort(portName, baudRate, Parity.None, 8, StopBits.One);
        //または
        //serialPort_ = new SerialPort(portName, baudRate);
        serialPort_.ReadTimeout = 20;//Add this 2019
        serialPort_.Open();
        serialPort_.NewLine = "\n";//Add this 2019

        isRunning_ = true;

        thread_ = new Thread(Read);
        thread_.Start();
    }

    private void Close()
    {
        //isNewMessageReceived_ = false;
        isRunning_ = false;

        if (thread_ != null && thread_.IsAlive)
        {
            thread_.Join();
        }

        if (serialPort_ != null && serialPort_.IsOpen)
        {
            serialPort_.Close();
            serialPort_.Dispose();
        }
    }

    private void Read()
    {
        while (isRunning_ && serialPort_ != null && serialPort_.IsOpen)
        {
            try
            {
                message_ = serialPort_.ReadLine();
                isNewMessageReceived_ = true;
            }
            catch (System.Exception e)
            {
            //    Debug.LogWarning(e.Message);
            }
        }
    }

    public void Write(string message)
    {
        try
        {
            serialPort_.Write(message);
        }
        catch (System.Exception e)
        {
            Debug.LogWarning(e.Message);
        }
    }
}


Unityボタン側スクリプト

Btn.cs

using System.Collections;
using System.Collections.Generic;
using UnityEngine;
using UnityEngine.UI;

public class Btn : MonoBehaviour
{
    //先ほど作成したクラス
    public SerialHandler serialHandler;


  void Start()
    {
        //信号を受信したときに、そのメッセージの処理を行う
        serialHandler.OnDataReceived += OnDataReceived;
    }

    void Updata()
    {
        //文字列を送信
       // serialHandler.Write("hogehoge");
    }

    //受信した信号(message)に対する処理
    void OnDataReceived(string message)
    {
        var data = message.Split(
                new string[] { "\t" }, System.StringSplitOptions.None);
        if (data.Length < 2) return;

        try
        {
         
        }
        catch (System.Exception e)
        {
            Debug.LogWarning(e.Message);
        }
    }


    /////ここから追加します
    /// 
    /// 
    /// 
    ///
    public void sendOn()
    {
        //Arduinoに文字列onを送る
        serialHandler.Write("4");
    }

    public void sendOff()
    {
        //
        serialHandler.Write("5");
    }
    public void ledOn()
    {
        //
        serialHandler.Write("6");
    }

    public void ledOff()
    {
        //
        serialHandler.Write("7");
    }

}


Arduino側コード

#include <Servo.h>
const int LED_PIN = 13;
int SERVO_SOCKET = 9;
Servo servo;
String InByte_strings;
int InByte;

void setup() {
 Serial.begin(9600);
 pinMode( LED_PIN, OUTPUT );
servo.attach( SERVO_SOCKET );
}

void loop() {
  
  if(Serial.available()>0){
    InByte_strings=Serial.readStringUntil(';');
    InByte=InByte_strings.toInt();
    Serial.println(InByte);

     switch (InByte){
    case 4:
      servo.write( 90 );
      break;
    case 5:
      servo.write( 180 );
      break;
      case 6:
      digitalWrite(LED_PIN,HIGH);
      break;
      case 7:
      digitalWrite(LED_PIN,LOW);
      break;
  }
}
}


Oculus Quest開発メモ

Oculus Quest 開発メモ

https://qiita.com/pira/items/1c935f30d5ba6c020333

https://framesynthesis.jp/tech/unity/oculusquest/

https://qiita.com/pira/items/1c935f30d5ba6c020333


細かい部分はGoの解説でも網羅できる.

MacにOculus接続時=開発者モードをONにするとつながる

つながった後は開発者モードONでいいらしい

OVRPlugin.aar” is denied.

てエラー出る(ビルドはできるけどapk表示されない)

Reveal in FinderでFinderでそのファイルを見つけ,拡張子を.aarから.bakにする

Oculusを接続したまま,Build & Run する

実行される.


Unity Timelineを利用したアニメーション

ピタゴラ装置を作る中で,巨大なピタゴラ装置を作りたくても画面からはみ出たりするかもしれません.そこで,次の方法でカメラアニメーションを入れてみましょう.

TimeLineを追加する

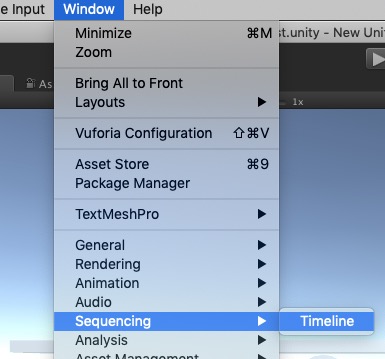
  1. Window>Sequencing>Timelineを選択
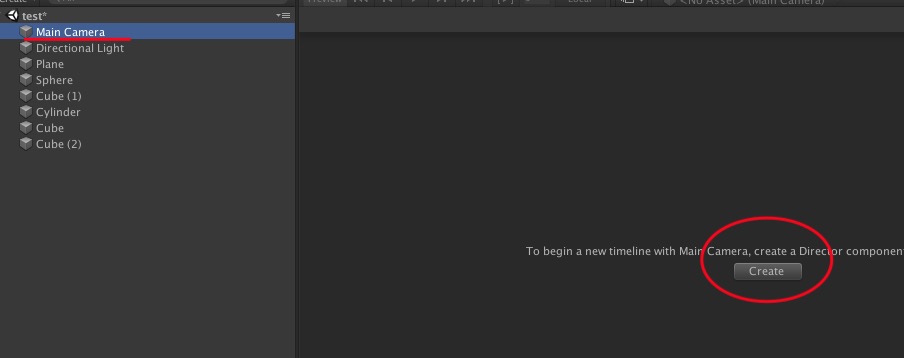
  2. MainCameraを選択しながら,Timeline画面に表示されるCreateボタンをクリック
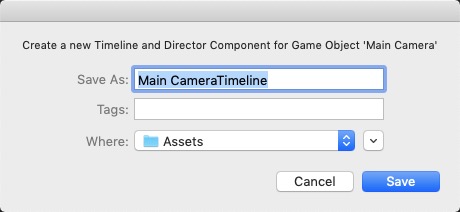
  3. MainCameraのTimelineを保存するか訪ねられるので,Saveで保存する
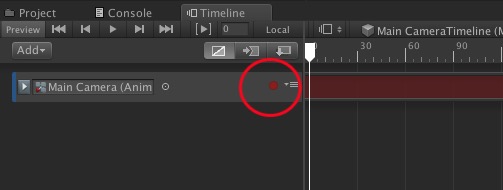
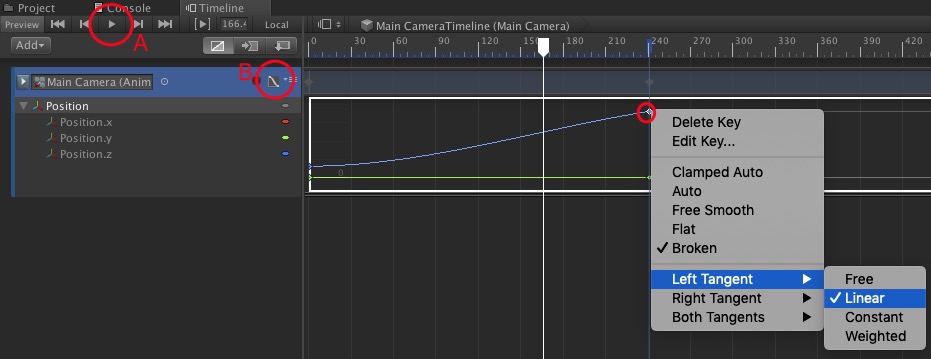
  4. TimelineのMainCameraトラックを選択し,赤丸のRecordingボタンをクリックする
  5. MainCameraを選択し,PositionやRotationなどを変化させる.キーフレームが打たれる.時間を変更しまたキーフレームを打つなどしアニメーションを作成する
  6. Timelineの再生ボタン(下図A)で動きを確認できる(ただしシミュレーションは働かない)
  7. アニメーションの編集などは,下図Bをクリックするとアニメーションカーブで編集できる
  8. 各キーフレームはベジェカーブで編集できる.またキーフレームを右クリックするとカーブの種類を変更できる.上図はキーフレームの左側を直線(Linear)に変更している
  9. 元に戻すには,Compared Autoを選択する

Unity入門-1_3

Physic Materialを設定します

  1. Assets>Create>Physic Materialを選択
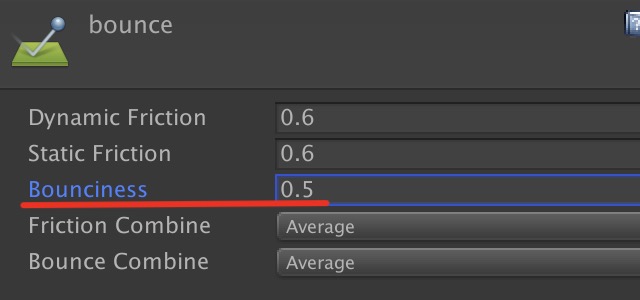
  2. Assetsフォルダ内にPhysic Materialが作成されるので,名称をBounceに変更(名称は何でもいい)
  3. Bounceを選択し,InspectorのBouncinessを0.5に変更
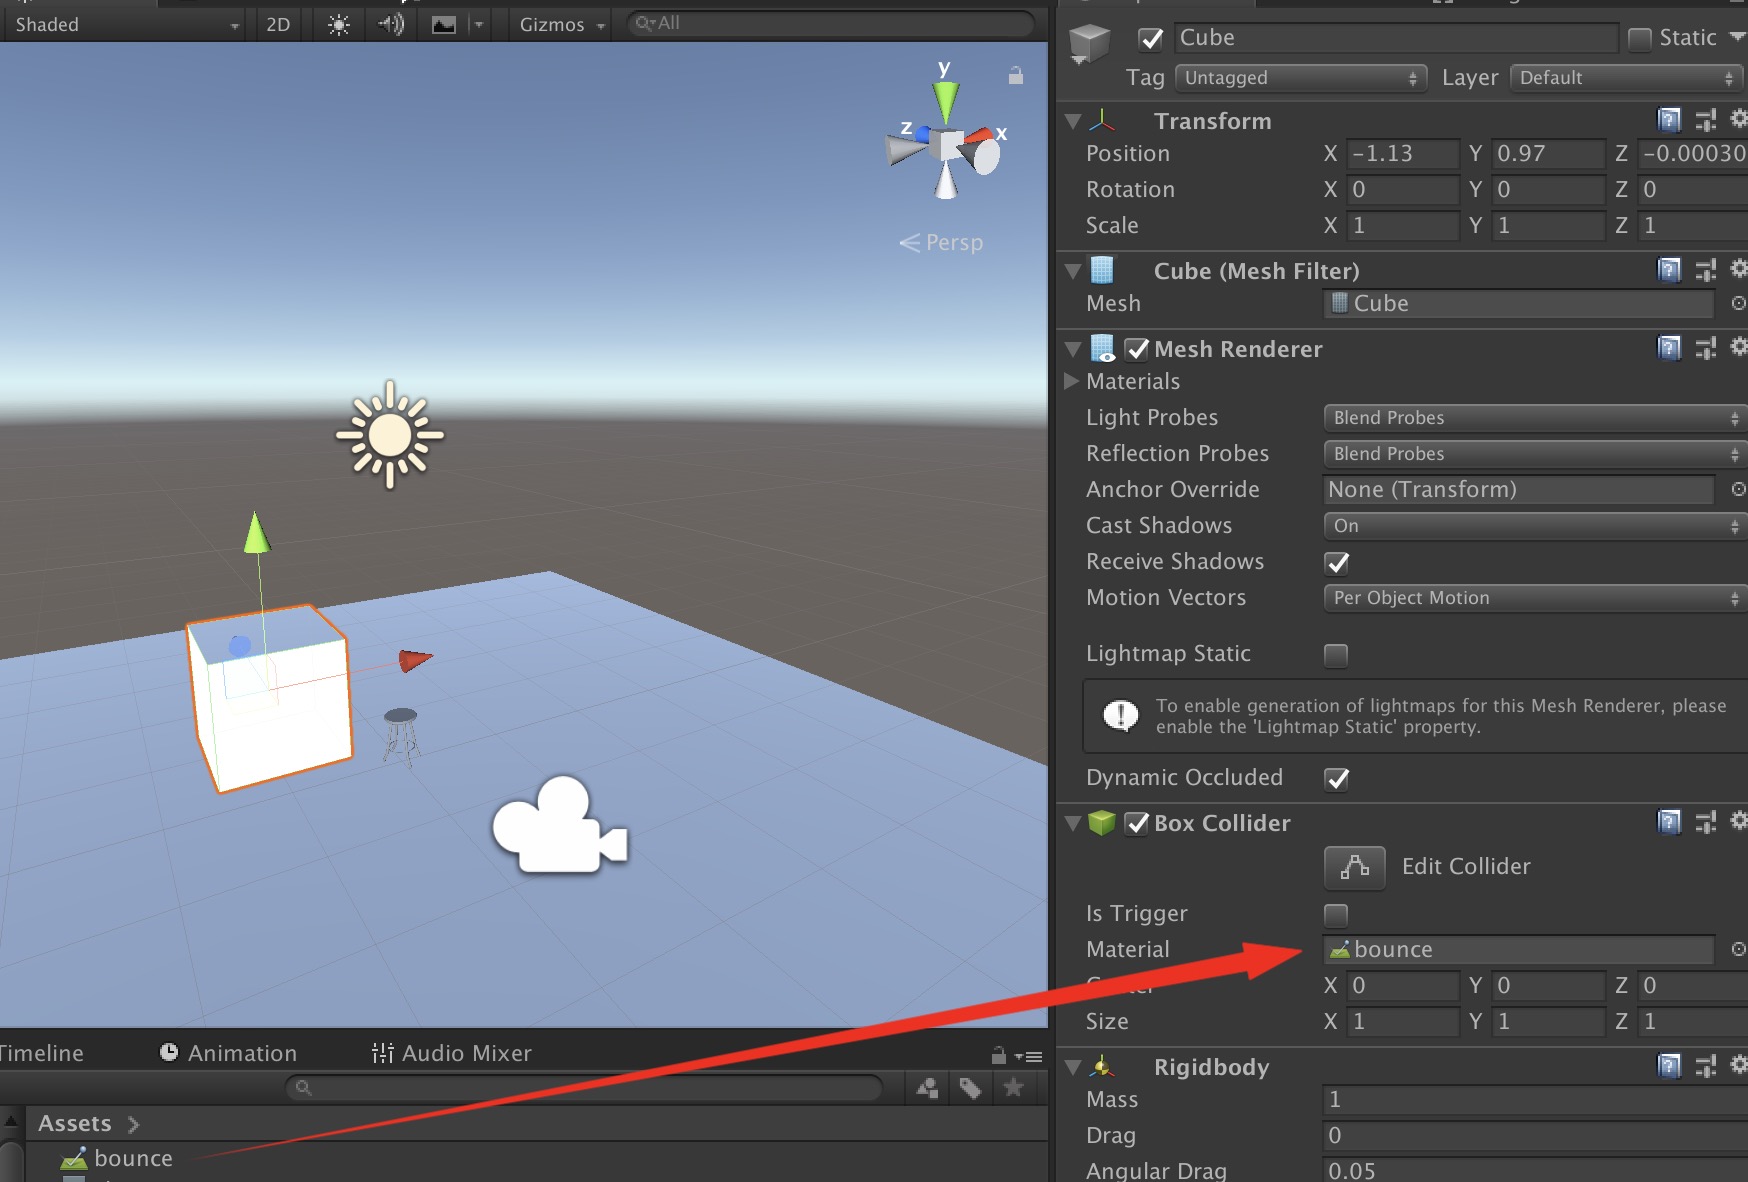
  4. Cubeを選択し,BoxColliderコンポーネントのMaterialに作成したBounceをドロップする
  5. 再生し変化を確認する